Overview
ScheduleCom is a schedule publishing system designed for the Ready Mix, construction materials, and other trucking/delivery industries. ScheduleCom allows your dispatch staff to generate a schedule by combining employees, vehicles, work locations and start times. Once the schedule is published, an employee is able to call into the system and hear their schedule as well as any employee messages and questions they need to receive. Additionally, an employee can leave a recorded call in message if they cannot work, arrive on time, etc ScheduleCom also does away with the cumbersome use of recording equipment. The system uses a Text to Speech generator that transfers text entered into a database field and generates speech audio of the data. One of the many benefits of using ScheduleCom is each of your employees receives only the schedule information pertaining to them, and the system logs which employees have accessed the system and received their schedule. Accessing the ScheduleCom Application is easy, simply launch your preferred web browser from any computer and input ScheduleCom's URL http://ondemand.schedulecom4.com .
Logging into the system
ScheduleCom users will log into the system on the main home page. Simply enter your user-name and password and click the Login button to access your account. Users also have the option of allowing the browser to remember the users password by checking the Remember Me box in the lower left corner of the Login window. (!!WARNING!! See the "Remember Me" section below for important features and security information about this option!) Users can also navigate to the My Schedule login page by clicking the My Schedule link in the lower right hand corner of the login window. An example of the login window is shown below.
Remember Me
In the bottom left corner of the login window there is a check-box labeled Remember Me. By default ScheduleCom will automatically log you out of the system if your session has been idle for a specified period of time.
Checking the Remember Me field causes three things to happen:
- It will keep the system from logging you out as long as your browser is open.
- If you close your browser, re-open it and go to the ScheduleCom application, the system will automatically log you in.
- Clicking the Log-off link in the upper right-hand corner of the screen is the only way to log out of the system if you have Remember Login checked.
Using the ScheduleCom Application
The ScheduleCom Application was created using a Portal structure which allows ScheduleCom to provide information from different areas or systems into a single User Interface. Once logged in, navigating around the application is very easy but it may help to understand the different methods; Tabs, Links, and Snapshots are used to navigate and display information in the application.
Tabs, Links, and Snapshots
The ScheduleCom application uses several navigational and information display methods. The use of Tabs, Links, and Snapshots provide us with an intuitive way to navigate the application as well as get the information we need in an easy to read format.
Tabs
Tabs are the main navigational element used to move between screens in the application. They sit near the top of most screens and when clicked take you to another functional area. They are built in such a way that shows you what screen you are on as well as what else is available to you. Since the ScheduleCom application is secured using roles, such as Dispatcher or Administrator, the tabs at the top may be different for different roles. For example the Administrator tabs might look as follows:
Links
Links are used by the ScheduleCom application to trigger an action. This might be to launch a report, save information to a form, or connect to another website. Most pages will have a Quick Links section to provide you with a set of page appropriate links for a specific tab like the following:
|
|
|
Info Snapshots
Info snapshots are small summary reports off to the side of a screen that give you business supported information that is updated regularly throughout the day. For example, on the schedule screen you will find an Info Snapshot report for Employee Call-ins as well as an Info Snapshot report for Saturday Volunteers. This allows you to see any up to date schedule impacting information as you create or manage the daily schedule.
| Location | Name | Volunteered |
| Main Plant | Douglas, Jerry | 05/05/2016 6:02 PM |
| Older Plant | Armstrong, James 1418 | 05/01/2016 1:43 PM |
Snapshots can also be used to provide management with business critical information such as sales figures or hours worked for the week or month.
Saving Information on a Form
Once you have completed filling out information on a form and are ready to save it, you will have three processing options to choose from.
Processing Options:
- Apply Changes
- Apply Changes and Exit
- Exit
Clicking the Apply Changes button will save your information and check for any errors. These errors could include invalid Phone or E-mail formats or Required Fields that are missing data. Once the save is completed you will remain on the current screen with your changes saved. Clicking the Apply Changes and Exit button will save your information and check for any errors. Once the save is completed you will be returned to the previous screen. Finally clicking the Exit button without first clicking the Apply Changes button will return you to the previous screen without saving the screen. Note: If you click Apply Changes button before clicking the Exit button your changes will be saved.
Changing Companies
Depending on how your organization is set up and how your ScheduleCom User Account is configured, you may have access to more than one company’s data. If you do, then you will see a drop down list at the top right side of the screen with the names of the companies you have access to. The company you are currently accessing will be selected in the drop down list. To change the companies you are accessing simply select the company you want to access from the drop down list and ScheduleCom will automatically import the new company’s data.
Logging Out of the System
To log off of the ScheduleCom system click the word Log-off in the upper right-hand corner of your screen. This will log you out of the system and take you to the main ScheduleCom Home page.
Setting up the ScheduleCom System
Before you can start using the ScheduleCom system you need to do some initial setup. This includes setting up reference information.
The following order should be followed when initially entering reference information:
- Location Types
- Locations
- Vehicle Types
- Vehicles
- Employee Types
- Employees
Some reference entries, such as Locations, make reference to others, such as Location Types. Employee entries reference Vehicles and Locations (a driver will start with a default vehicle at a default location in the schedule entry area). Once these entries are completed, we can begin building a schedule.
ScheduleCom Home
The ScheduleCom Home screen gives the user a dashboard containing Employee, Vehicle, and Schedule status. You can change the schedule date with the date picker near the top of the page to view information about previous schedules. The current schedule date is selected by default and displays real time information about the current schedule. Click the View Details link to view a report of the desired widget.

Reference Admin
The Reference Admin section allows you to manage Reference and Employee level information. This includes adding and managing employees, vehicles, locations, messages and questions. We go through each of these below in more detail. To view the Reference Admin section just click on the Reference Admin tab.
Manage Employees
Since ScheduleCom schedules an employee to work we must have a list of Employees to schedule. This reference table is different from the Users table because not all employees will have access to the actual application outside of checking their schedule. The Manage Employees section of the Reference Admin Tab allows you to Add, Edit, Delete, Reactivate or Edit the Seniority Number of an employee from the application. You may also choose Employee Listing to generate a printable list of all employees that have been added.
To Add a New Employee
Click the Add button next to the drop down list of Employees. This will take you to the Employee Admin screen and will automatically generate an Employee record for you:
Once you are in the Employee Admin screen you can change the default Employee Name New Employee0 to the one you would like to use for this record and then fill out the applicable information. Once you have completed the form choose Apply or Apply and Exit to save the new record. You may also choose Exit if you want to return to the previous screen without saving any entered information.

Employee Field Descriptions
The Add Employee and Edit Employee screens have many editable fields. Below is a list of all the editable employee fields and their descriptions.
| Employee Field | Description |
|---|---|
| Employee Type | Selects the type of Employee (Laborer, Driver, Dispatch, etc.) |
| First/Last Name | Enter the employee's name. |
| Title | Enter employee's title. |
| Default Location | Select the default location for the employee. |
| Default Vehicle | Select the default vehicle for the employee. |
| Default Start Time | Enter the default start time for the employee. This will be used to populate the schedule screen when it is initially created. |
| Daily Start Times | Monday-Friday:If the employee has different default start times for different days of the week then enter them here. If there is not a default start time for a particular day then the schedule will look to the Default Start Time to populate the initial schedule. |
| Start Time Notes | Enter any notes regarding the employee’s start times. |
| UserID | Enter the user's identification number they will use to retrieve their schedule. |
| Password | Enter the user's password they will use when retrieving their schedule. |
| Address/Phone/Email | Enter employee's contact information here. |
| Trainee Start Date | Indicates the starting date for an employee's training period. |
| Trainee End Date | Indicates the ending date for an employee's training period. |
| Trainer | Select the employee's trainer from the list. |
| Trainer Qualified | If checked this employee will be included on the "Trainer" list. |
| Hire Date | The employee's initial start date. |
| Seniority Date | The employee's seniority date if applicable. |
| Seniority Number | The employee's seniority number if applicable. |
| Termination Date | Enter the date the employee was terminated. |
| Payroll ID | The employee's ID from the payroll system. |
| Dispatch ID | The employee's ID from the dispatch system. |
| Regular Days Off | Check the employee’s regular days off. If configured in the company record an outage will be created for each day that is checked and the employee will not be available for scheduling. |
| Language | Choose the language that the employee's schedule will be received in. |
| Saturday Volunteer | If the employee volunteers for Saturday work the date of that Saturday will be populated in this field. The program determines who is a volunteer using this field. |
| License Date | |
| Medical Date | |
| Notes | Add any additional notes for employee's record here. |
Additional Employee Fields
In addition to the fields listed above you can also add Employee Outages, Employee Messages, and Employee Questions from the add or edit employee forms. You can also move an employee to another company under the Employee Move section. For more information on any of these fields choose their link below:
To Edit an Employee
From the Reference Admin Tab select an Employee from the Employees drop down list under the Manage Employee section of the screen. Click the pencil icon to edit the employee record. Just like in the Add Employee screen you can edit any field you see. Choose Apply or Apply and Exit to apply changes and complete the edit. To exit without saving any edits made to the employee record choose Exit.
To Delete an Employee
From the Reference Admin Tab select an Employee from the Employees drop down list under the Manage Employees section of the screen and click the icon. When the "Continue with delete?" dialog box comes up click OK and the delete will be processed. If you clicked the icon by mistake or have changed your mind, simply click the Cancel button on the Delete Dialog Box and you will be returned to the screen without deleting the record.
To Reactivate an Employee
Some reference records can be reactivated to reverse the Delete operation. To reactivate an Employee record, select it from the Inactive Employees list and click Reactivate.
To Edit Seniority Number of Employee
To edit an employee's seniority number click the Edit Seniority Numbers button in the Manage Employees section of the Reference Admin Tab to open the "Manage Seniority Numbers" form.
The "Manage Seniority Numbers" form provides a list of current employees, their default location, and their seniority number. The employee list can be filtered by the employee's default location. Choose the location from the drop down list and click the filter icon to only see employees with chosen default location. To edit an employee's seniority number add the new seniority number in the "New #" field provided then choose Apply Changes or Apply Changes and Exit to save changes. Choose Exit to close form without saving.
| Location | Employee Name | Sen # | New # |
| Adgate, Victor 1422 | 0 | ||
| Main Dispatch | Waters, Nicole | 8 | |
| Main Dispatch | Twain, Sara | 9 | |
| Main Plant | Smith, Mark | 1 | |
| Main Plant | Krauss, Bob | 3 | |
| Main Plant | Morris, Ned | 4 |
To Generate Employee Listing
Clicking the Employee Listing button will generate a exportable and printable employee listing report including: Employee Type, Name, UserID, Location, Vehicle and Start Time. To export the report to your local machine simply choose the file format you would like to export from the drop down menu and click Export. You can toggle between an Interactive View and a Print Preview by clicking the "Camera icon". To print click the "Printer" icon. To close the report and return to SchedueCom click the "X" in the upper right corner of the window.
Manage Employee Types
Employee Types allow us to group employees by their titles such as Driver or Batch-men. This tells the system how to schedule the employee using business rules based on their titles. The Manage Employee Types section of the Reference Admin Tab allows you to Add, Edit, and Delete an Employee Type from the application. Once in the Reference Admin Tab select what you would like to do to an Employee Type. You may also choose Employee Type Listing to generate a printable list of all employee types that have been added.
To Add a New Employee Type
Click the Add button next to the drop down list of Employee Types. This will take you to the Employee Type Admin screen and will automatically generate an Employee Type record for you:
Change the default Employee Type Name New Employee_Type0 to the one you would like to use for this record. You may also add a note to the Employee Type being added in the available text box. Choose Apply or Apply and Exit to complete the new record. You may also choose Exit at any time to return to the Reference Admin page however any changes made will not be recorded unless you choose Apply before Exit.
To Edit an Employee Type
From the Reference Admin Tab select an Employee Type from the Employee Types drop down list under the Manage Employee Types section. Click the pencil icon to edit the Employee Type record. This will take you to the Employee Type Admin screen with the Employee Type information displayed on screen. Just like in the Add Employee Type screen you can edit any field you see. Choose Apply or Apply and Exit to save the edit. Choose Exit if you do not want to save changes.
To Delete an Employee Type
From the Reference Admin Tab select an Employee Type from the Employee Types drop down list under the Manage Employee Types section. Click the delete icon to delete the Employee Type record.
To Generate an Employee Type Listing
Clicking the Employee Type Listing button will generate a exportable and printable employee type listing report including: Employee Types and any notes added to employee types. To export the report to your local machine simply choose the file format you would like to export from the drop down menu and click Export. You can toggle between an Interactive View and a Print Preview by clicking the "Camera icon". To print click the "Printer" icon. To close the report and return to SchedueCom click the "X" in the upper right corner of the window.
Manage Locations
Locations are all of the company Locations an employee may work at or pick up a load from. The Manage Locations section of the Reference Admin Tab allows you to Add, Edit, and Delete a Location from the application. You may also choose Location Listing to generate a printable list of all the locations that have been added. Once in the Reference Admin screen select what you would like to do to a Location.
To Add a New Location
Click the Add button next to the drop down list of Locations. This will take you to the Location Admin screen and will automatically generate a Location record for you:
Choose a Location Type from the drop down menu and change the default Location New Location0 to the one you would like to use for this record. You can also add a Description, Dispatch ID, or leave Notes for the Location. Choose Apply or Apply and Exit to complete the new record. You may also choose Exit at any time to return to the Reference Admin page however any changes made will not be recorded unless you choose Apply before Exit.
To Edit a Location
From the Reference Admin Tab select a Location from the Locations drop down list under the Manage Locations section. Click the pencil icon to edit the Location record. This will take you to the Location Admin screen with the location information displayed on screen. Just like in the Add Location screen you can edit any field you see. Choose Apply or Apply and Exit to save the edit. Choose Exit if you do not want to save changes.
To Delete a Location
From the Reference Admin Tab select a Location from the Locations drop down list under the Manage Locations section of the screen and click the icon. When the "Continue with delete?" dialog box comes up click OK and the delete will be processed. If you clicked the icon by mistake or have changed your mind, simply click the Cancel button on the Delete Dialog Box and you will be returned to the screen without deleting the location.
To Generate a Locations Listing
Clicking the Location Listing button will generate a exportable and printable locations listing report including: Location Type, Location, Description, and Notes. To export the report to your local machine simply choose the file format you would like to export from the drop down menu and click Export. You can toggle between an Interactive View and a Print Preview by clicking the "Camera icon". To print click the "Printer" icon. To close the report and return to SchedueCom click the "X" in the upper right corner of the window.
Manage Location Types
Location Types allow us to group different locations by their primary function such as a Batch Plant or Office. The Manage Location Types section of the Reference Admin Tab allows you to Add, Edit, or Delete a Location Type from the application. You may also choose Location Type Listing to generate a printable list of all the location types that have been added. Once in the Reference Admin screen select what you would like to do from the Manage Location Type section.
To Add a New Location Type
Click the Add button next to the drop down list of Location Types. This will take you to the Location Type Admin screen and will automatically generate a Location Type record for you:
Change the default Location Type Name New Location_Type0 to the one you would like to use for this record. You can also add Notes for the Location Type. Choose Apply or Apply and Exit to complete the new record. You may also choose Exit at any time to return to the Reference Admin page however any changes made will not be recorded unless you choose Apply before Exit.
To Edit a Location Type
From the Reference Admin Tab select a Location Type from the Location Types drop down list under the Manage Location Types section. Click the pencil icon to edit the Location Type record. This will take you to the Location Type Admin screen with the location type information displayed on screen. Just like in the Add Location Type screen you can edit any field you see. Choose Apply or Apply and Exit to save the edit. Choose Exit if you do not want to save changes.
To Delete a Location Type
From the Reference Admin Tab select a Location Type from the Location Types drop down list under the Manage Location Types section of the screen and click the icon. When the "Continue with delete?" dialog box comes up click OK and the delete will be processed. If you clicked the icon by mistake or have changed your mind, simply click the Cancel button on the Delete Dialog Box and you will be returned to the screen without deleting the location type.
To Generate a Location Type Listing
Clicking the Location Type Listing button will generate a exportable and printable location types listing report including: Location Type, and any notes about that Location Type. To export the report to your local machine simply choose the file format you would like to export from the drop down menu and click Export. You can toggle between an Interactive View and a Print Preview by clicking the "Camera icon". To print click the "Printer" icon. To close the report and return to SchedueCom click the "X" in the upper right corner of the window.
Manage Vehicles
ScheduleCom assigns employees to default vehicles, tracks vehicle outages and allows for the ability to move vehicles from one location to another. The Manage Vehicles section of the application allows an administrator to manage these vehicles. The Manage Vehicles section of the Reference Admin Tab allows you to Add, Edit, Delete, or Reactivate a particular vehicle in the application. You may also choose Vehicle Listing to generate a printable list of all the vehicles that have been added.
To Add a New Vehicle
Click the Add button next to the drop down list of Vehicles. This will take you to the Vehicle Admin screen and will automatically generate an Vehicle record for you:
Once you are in the vehicle Admin screen you can change the default Vehicle Number to the one you would like to use for this record and then fill out the applicable information. Once you have completed the form choose Apply or Apply and Exit to save the new record. You may also choose Exit if you want to return to the previous screen without saving any entered information.
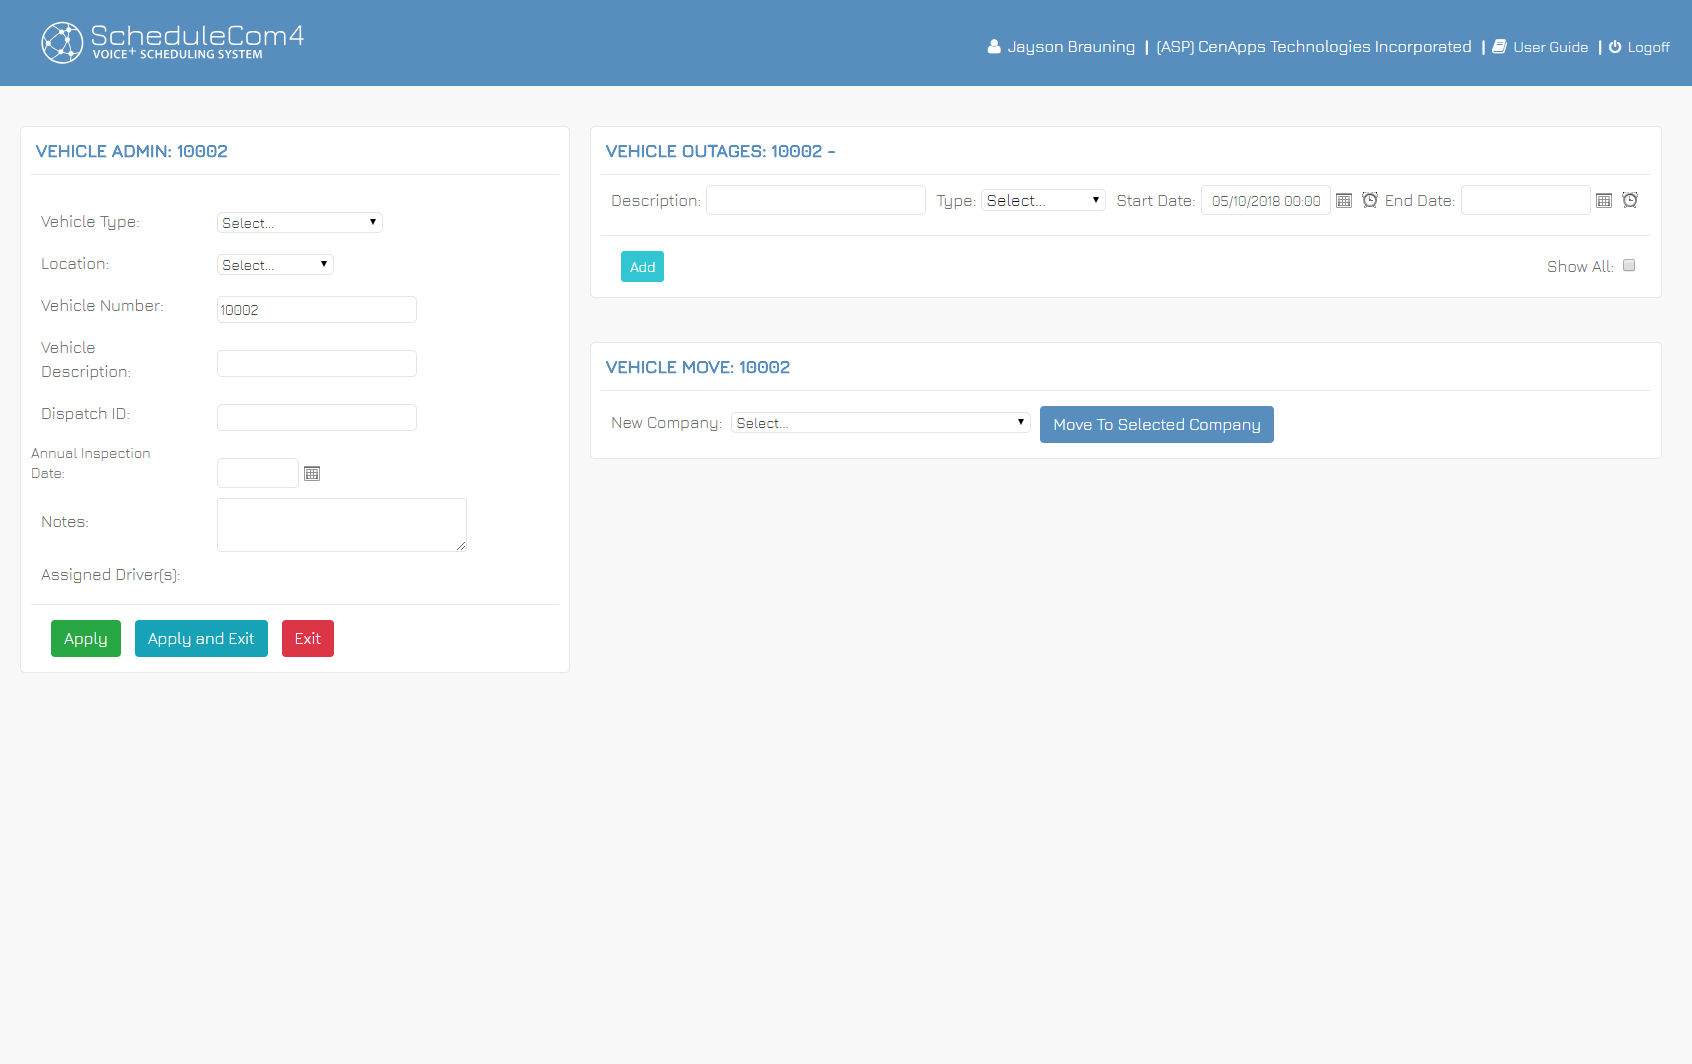
In addition to the vehicle description fields you may also choose to set a vehicle Outage or move a vehicle to another company from the Vehicle Admin screen. For more information on Vehicle Outages or Vehicle Move click the links below.
To Edit a Vehicle
From the Reference Admin Tab select a Vehicle from the Vehicles drop down list under the Manage Vehicles section of the screen. Click the pencil icon to edit the vehicle record. Just like in the Add Vehicle screen you can edit any field you see. Choose Apply or Apply and Exit to apply changes and complete the edit. To exit without saving any edits made to the vehicle record choose Exit.
To Delete a Vehicle
From the Reference Admin Tab select a Vehicle from the Vehicles drop down list under the Manage Vehicles section of the screen and click the icon. When the "Continue with delete?" dialog box comes up click OK and the delete will be processed. If you clicked the icon by mistake or have changed your mind, simply click the Cancel button on the Delete Dialog Box and you will be returned to the screen without deleting the vehicle.
Vehicle Listing
Clicking the Vehicle Listing button will generate a exportable and printable vehicle listing report including: Vehicle Type, Number, Description, Location, and Notes. To export the report to your local machine simply choose the file format you would like to export from the drop down menu and click Export. You can toggle between an Interactive View and a Print Preview by clicking the "Camera icon". To print click the "Printer" icon. To close the report and return to SchedueCom click the "X" in the upper right corner of the window.
To Reactivate a Vehicle
Some reference records can be reactivated to reverse the Delete operation. To reactivate a Vehicle record, select it from the Inactive Vehicles list and click Reactivate.
Vehicle Outages
The add and edit vehicle admin screens allow you to set a vehicle outage. Under the Manage Vehicle section of the Reference Admin Tab choose to add a new vehicle Add or choose one from the Vehicles drop down menu and click the edit icon . Once in the Vehicle Admin screen fill in the fields under Vehicle Outage. Once you have completed the form choose Apply or Apply and Exit to save the new record. You may also choose Exit if you want to return to the previous screen without saving any entered information.
To Move a Vehicle
The add and edit vehicle admin screens allow you to move a vehicle. Under the Manage Vehicle section of the Reference Admin Tab choose to add a new vehicle Add or choose one from the Vehicles drop down menu and click the edit icon . Under the Vehicle Move section choose a company from the drop down list of companies and choose Move To Selected Company.
Manage Vehicle Types
The Vehicle Type allows us to identify what application a particular vehicle is used for such as a mixer, loader, curbing truck, etc. The Manage Vehicle Types section of the Reference Admin Tab allows you to Add, Edit, and Delete a Vehicle Type from the application. Once in the Reference Admin Tab select what you would like to do to a Vehicle Type. You may also choose Vehicle Type Listing to generate a printable list of all vehicle types that have been added.
To Add a New Vehicle Type
Click the Add button next to the drop down list of Vehicle Types. This will take you to the Vehicle Type Admin screen and will automatically generate a Vehicle Type record for you:
Change the default Vehicle Type Name New Vehicle_Type0 to the one you would like to use for this record. You may also add a Vehicle Type Code, Dispatch ID, or a note to the Vehicle Type being added in the available fields. Choose Apply or Apply and Exit to complete the new record. You may also choose Exit at any time to return to the Reference Admin page however any changes made will not be recorded unless you choose Apply before Exit.
To Edit a Vehicle Type
From the Reference Admin Tab select a Vehicle Type from the Vehicle Types drop down list under the Manage Vehicle Types section. Click the pencil icon to edit the Vehicle Type record. This will take you to the Vehicle Type Admin screen with the Vehicle Type information displayed on screen. Just like in the Add Vehicle Type screen you can edit any field you see. Choose Apply or Apply and Exit to save the edit. Choose Exit if you do not want to save changes.
To Delete a Vehicle Type
From the Reference Admin Tab select a Vehicle Type from the Vehicle Types drop down list under the Manage Vehicles Types section of the screen and click the icon. When the "Continue with delete?" dialog box comes up click OK and the delete will be processed. If you clicked the icon by mistake or have changed your mind, simply click the Cancel button on the Delete Dialog Box and you will be returned to the screen without deleting the vehicle type.
Vehicle Type Listing
Clicking the Vehicle Type Listing button will generate a exportable and printable vehicle type listing report including: Vehicle Type, Type Code, and Notes. To export the report to your local machine simply choose the file format you would like to export from the drop down menu and click Export. You can toggle between an Interactive View and a Print Preview by clicking the "Camera icon". To print click the "Printer" icon. To close the report and return to SchedueCom click the "X" in the upper right corner of the window.
Manage Messages
The Manage Messages section of the Reference Admin Tab allows you to Add, Edit, and Delete a Pre-defined Message from the application. You may also choose Message Listing to generate a printable list of all the Messages that have been added. Once in the Reference Admin Tab select what you would like to do to a Message.
To Add a New Pre-Defined Message
Click the Add button next to the drop down list of Messages. This will take you to the Message Admin screen and will automatically generate a new Pre-Defined message for you:
Change the default Message Name New Message0 to the one you would like to use for this message. In the message text field, type the message you would like to convert to speech. You may also play the message back once typed, choose the message text language, or add a note to the Message being added in the available fields. Choose Apply or Apply and Exit to complete the new message. You may also choose Exit at any time to return to the Reference Admin page however any changes made will not be recorded unless you choose Apply before Exit.
To Edit a Message
From the Reference Admin Tab select a Message from the Messages drop down list under the Manage Messages section. Click the pencil icon to edit the selected message. This will take you to the Message Admin screen with the Message information displayed on screen. Just like in the Add Message screen you can edit any field you see. Choose Apply or Apply and Exit to save the edit. Choose Exit if you do not want to save changes.
To Delete a Message
From the Reference Admin Tab select a Message from the Messages drop down list under the Manage Messages section of the screen and click the icon. When the "Continue with delete?" dialog box comes up click OK and the delete will be processed. If you clicked the icon by mistake or have changed your mind, simply click the Cancel button on the Delete Dialog Box and you will be returned to the screen without deleting the Message.
To Generate a Message Listing
Clicking the Message Listing button will generate a exportable and printable message listing report including: Message, Message Text, and Notes. To export the report to your local machine simply choose the file format you would like to export from the drop down menu and click Export. You can toggle between an Interactive View and a Print Preview by clicking the "Camera icon". To print click the "Printer" icon. To close the report and return to SchedueCom click the "X" in the upper right corner of the window.
Manage Questions
The Manage Questions section of the Reference Admin Tab allows you to Add, Edit, and Delete a Pre-defined Question from the application. You may also choose Question Listing to generate a printable list of all the Questions that have been added. Once in the Reference Admin Tab select what you would like to do to a Question.
To Add a Pre-Defined Question
Click the Add button next to the drop down list of Questions. This will take you to the Question Admin screen and will automatically generate a new Pre-Defined Question for you:
Change the default Question Name “New Question0” to the one you would like to use for this record then fill out the remaining applicable fields. Choose Apply or Apply and Exit to complete the new Question. You may also choose Exit at any time to return to the Reference Admin page however any changes made will not be recorded unless you choose Apply before Exit.
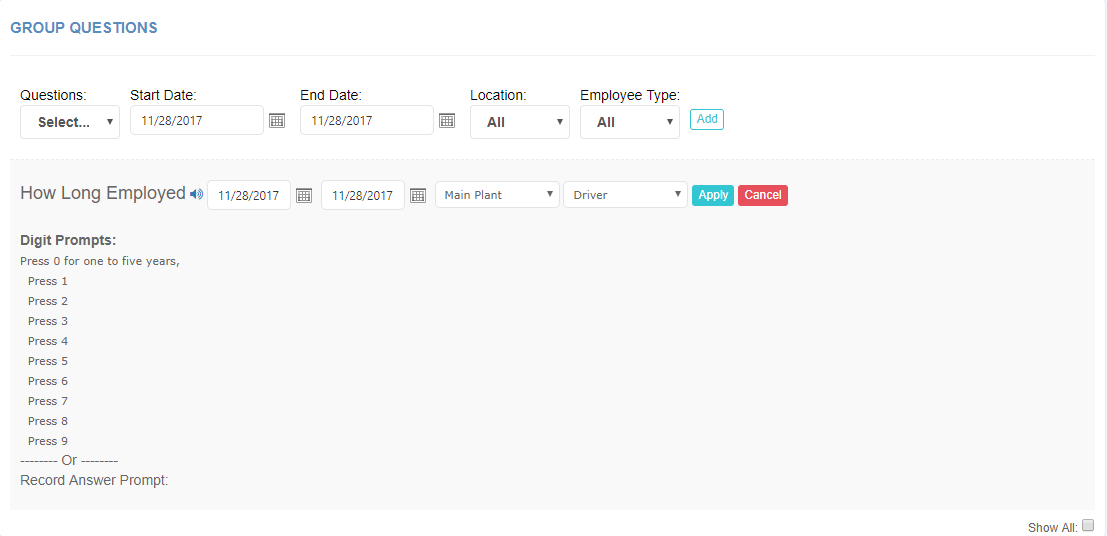
When you create a question, you will also need to define answers that employees can choose from. You can store up to ten different answers for a question to be selected by the employee pressing digits 0 – 9 on their telephone. Each text box holds the prompt for the answer related to the numbers 0-9.
For instance, if the question text was “How long have you been working for us?” and the answers desired are:
- One to Five Years
- Six to Ten Years
- Eleven to Fifteen Years
This question would be composed on screen as below:
The system would read the question text “How long have you been working for us?” then read each answer as:
- “Press 0 for one to five years.”
- “Press 1 for six to ten years.”
- “Press 2 for eleven to fifteen years.”
To Edit a Question
From the Reference Admin Tab select a Question from the Questions drop down list under the Manage Questions section. Click the pencil icon to edit the selected question. This will take you to the Question Admin screen with the questions information displayed on screen. Just like in the Add Question screen you can edit any field you see. Choose Apply or Apply and Exit to save the edit. Choose Exit if you do not want to save changes.
To Delete a Question
From the Reference Admin Tab select a Question from the Questions drop down list under the Manage Questions section of the screen and click the icon. When the "Continue with delete?" dialog box comes up click OK and the delete will be processed. If you clicked the icon by mistake or have changed your mind, simply click the Cancel button on the Delete Dialog Box and you will be returned to the screen without deleting the Question.
Pre-Defined Question Listing
Clicking the Question Listing button will generate a exportable and printable question listing report of Questions and Answers. To export the report to your local machine simply choose the file format you would like to export from the drop down menu and click Export. You can toggle between an Interactive View and a Print Preview by clicking the "Camera icon". To print click the "Printer" icon. To close the report and return to SchedueCom click the "X" in the upper right corner of the window.
Manage Message Blasts
The Manage Message Blasts section of the Reference Admin Tab allows you to Add, Edit, and Delete a Message Blast from the application. You may also choose Message Blast Listing to generate a printable list of all the Message Blasts that have been added. Once in the Reference Admin Tab select what you would like to do to a Message Blast.
To Add a Message Blast
Click the Add button next to the drop down list of Message Blasts. This will take you to the Message Blast Admin screen and will automatically generate a new Message Blast for you:
Enter a Message Blast Name you would like to use for this record then fill out the remaining applicable fields described below. Choose Apply or Apply and Exit to complete the new Message Blast. You may also choose Exit at any time to return to the Reference Admin page however any changes made will not be recorded unless you choose Apply before Exit.
| Message Blast Field | Description |
|---|---|
| Message Blast Name | Unique name assigned to this message. |
| Message Blast Status | Active or Inactive; indicates if message is currently in use. |
| Message Text | The actual text of the message that will be sent to employees. |
| Send with Schedule Publish | Check this box to have message sent automatically when a new schedule is published. Only one Message Blast message can have this box checked, although it can be changed at anytime. If no messages have this box checked, then a message blast will not be sent when a new schedule is published. |
| Include Schedule | For any message that is created, the employee’s current schedule (the schedule they will hear if they call in) can be added to the end of the text message. |
| Notes | Notes are only for the message creator |
To Edit a Message Blast
From the Reference Admin Tab select a Message Blast from the Messages Blast drop down list under the Manage Message Blasts section. Click the pencil icon to edit the selected Message Blast. This will take you to the Message Blast Admin screen with the Message Blasts information displayed on screen. Just like in the Add Message Blast screen you can edit any field you see. Choose Apply or Apply and Exit to save the edit. Choose Exit if you do not want to save changes.
To Delete a Message Blast
From the Reference Admin Tab select a Message Blast from the Messages Blasts drop down list under the Manage Message Blasts section of the screen and click the icon. When the "Continue with delete?" dialog box comes up click OK and the delete will be processed. If you clicked the icon by mistake or have changed your mind, simply click the Cancel button on the Delete Dialog Box and you will be returned to the screen without deleting the Message.
To Generate a Message Blasts Listing
Clicking the Message Blasts Listing button will generate a exportable and printable Message Blasts listing report including: Message, Message Text, and Notes. To export the report to your local machine simply choose the file format you would like to export from the drop down menu and click Export. You can toggle between an Interactive View and a Print Preview by clicking the "Camera icon". To print click the "Printer" icon. To close the report and return to SchedueCom click the "X" in the upper right corner of the window.
Manage Vehicle Outage Types
The Vehicle Outage Type allows us to identify standard vehicle outages such as a repair, spare, maintenance, etc. The Manage Vehicle Outage Types section of the Reference Admin Tab allows you to Add, Edit, and Delete a Vehicle Outage Type from the application. Once in the Reference Admin Tab select what you would like to do to a Vehicle Outage Type. You may also choose Vehicle Outage Type Listing to generate a printable list of all vehicle outage types that have been added.
To Add a New Vehicle Outage Type
Click the Add button next to the drop down list of Vehicle Outage Types. This will take you to the Vehicle Outage Type Admin screen and will automatically generate a Vehicle Outage Type record for you:
Change the default Vehicle Outage Type Name New Vehicle_Outage_Type0 to the one you would like to use for this record. You may also add a note to the Vehicle Outage Type being added in the available field. Choose Apply or Apply and Exit to complete the new record. You may also choose Exit at any time to return to the Reference Admin page however any changes made will not be recorded unless you choose Apply before Exit.
To Edit a Vehicle Outage Type
From the Reference Admin Tab select a Vehicle Outage Type from the Vehicle Outage Types drop down list under the Manage Vehicle Outage Types section. Click the pencil icon to edit the Vehicle Outage Type record. This will take you to the Vehicle Outage Type Admin screen with the Vehicle Outage Type information displayed on screen. Just like in the Add Vehicle Outage Type screen you can edit any field you see. Choose Apply or Apply and Exit to save the edit. Choose Exit if you do not want to save changes.
To Delete a Vehicle Outage Type
From the Reference Admin Tab select a Vehicle Outage Type from the Vehicle Outage Types drop down list under the Manage Vehicle Outage Types section of the screen and click the icon. When the "Continue with delete?" dialog box comes up click OK and the delete will be processed. If you clicked the icon by mistake or have changed your mind, simply click the Cancel button on the Delete Dialog Box and you will be returned to the screen without deleting the vehicle outage type.
Vehicle Outage Type Listing
Clicking the Vehicle Outage Type Listing button will generate a exportable and printable vehicle outage type listing report of all Vehicle Outage Types and Notes. To export the report to your local machine simply choose the file format you would like to export from the drop down menu and click Export. You can toggle between an Interactive View and a Print Preview by clicking the "Camera icon". To print click the "Printer" icon. To close the report and return to SchedueCom click the "X" in the upper right corner of the window.
Manage Employee Outage Types
The Employee Outage Type allows us to identify standard employee outages such as a sick, injury, excused, etc. The Manage Employee Outage Types section of the Reference Admin Tab allows you to Add, Edit, and Delete a Employee Outage Type from the application. Once in the Reference Admin Tab select what you would like to do to a Employee Outage Type. You may also choose Employee Outage Type Listing to generate a printable list of all employee outage types that have been added.
To Add a New Employee Outage Type
Click the Add button next to the drop down list of Employee Outage Types. This will take you to the Employee Outage Type Admin screen and will automatically generate a Employee Outage Type record for you:
Change the default Employee Outage Type Name New Employee_Outage_Type0 to the one you would like to use for this record. You may also add a note to the Employee Outage Type being added in the available field. Choose Apply or Apply and Exit to complete the new record. You may also choose Exit at any time to return to the Reference Admin page however any changes made will not be recorded unless you choose Apply before Exit.
To Edit a Employee Outage Type
From the Reference Admin Tab select a Employee Outage Type from the Employee Outage Types drop down list under the Manage Employee Outage Types section. Click the pencil icon to edit the Employee Outage Type record. This will take you to the Employee Outage Type Admin screen with the Employee Outage Type information displayed on screen. Just like in the Add Employee Outage Type screen you can edit any field you see. Choose Apply or Apply and Exit to save the edit. Choose Exit if you do not want to save changes.
To Delete a Employee Outage Type
From the Reference Admin Tab select a Employee Outage Type from the Employee Outage Types drop down list under the Manage Employee Outage Types section of the screen and click the icon. When the "Continue with delete?" dialog box comes up click OK and the delete will be processed. If you clicked the icon by mistake or have changed your mind, simply click the Cancel button on the Delete Dialog Box and you will be returned to the screen without deleting the employee outage type.
Employee Outage Type Listing
Clicking the Employee Outage Type Listing button will generate a exportable and printable employee outage type listing report of all Employee Outage Types and Notes. To export the report to your local machine simply choose the file format you would like to export from the drop down menu and click Export. You can toggle between an Interactive View and a Print Preview by clicking the "Camera icon". To print click the "Printer" icon. To close the report and return to SchedueCom click the "X" in the upper right corner of the window.
Managing the Training Process
The Training process consists of designating an employee as a Trainer and designating another employee as a Trainee. Once you have Trainers and Trainees designated you can assign one to the other. This will ensure the combination of employees will get scheduled together.
Designating an Employee as a Trainer
To designate an employee as a Trainer you will edit their user profile. From the Reference Admin screen select an Employee from the Employees drop down list under the Manage Employees section of the screen. Click the icon to edit the employee record.
Click the Trainer Qualified check box so that it shows a checkmark:
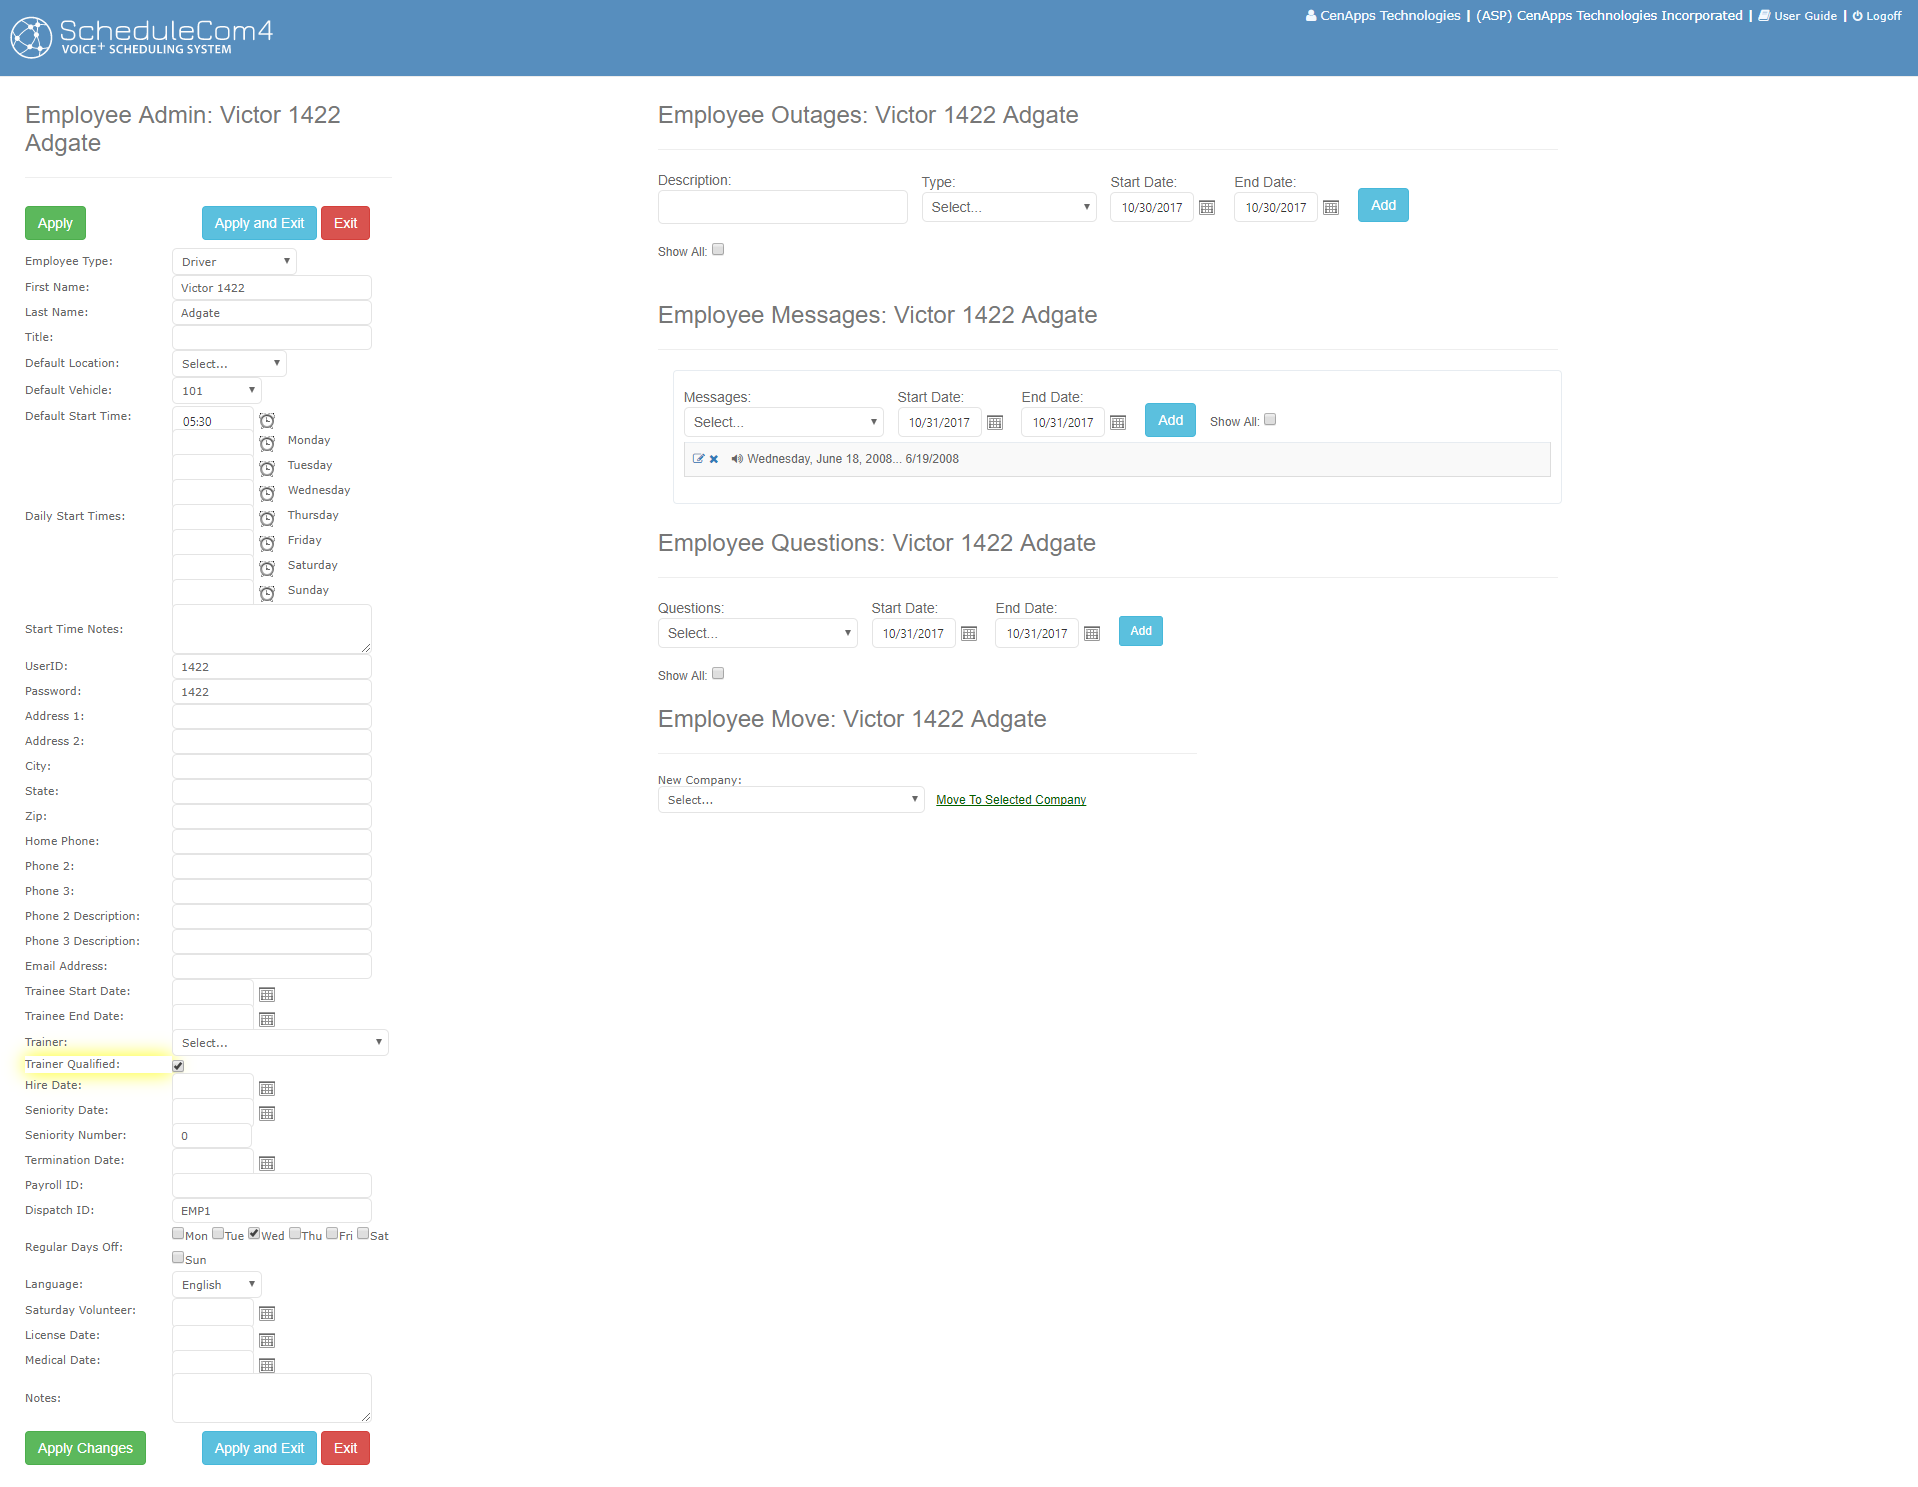
Click the Apply Changes to save this edit.
Designate an Employee as a Trainee and Assigning a Trainer
To designate an employee as a Trainee you will edit their user profile. From the Edit Employee screen, populate the Trainee Start Date with the date the Employee started training and the Trainee End Date (if known):
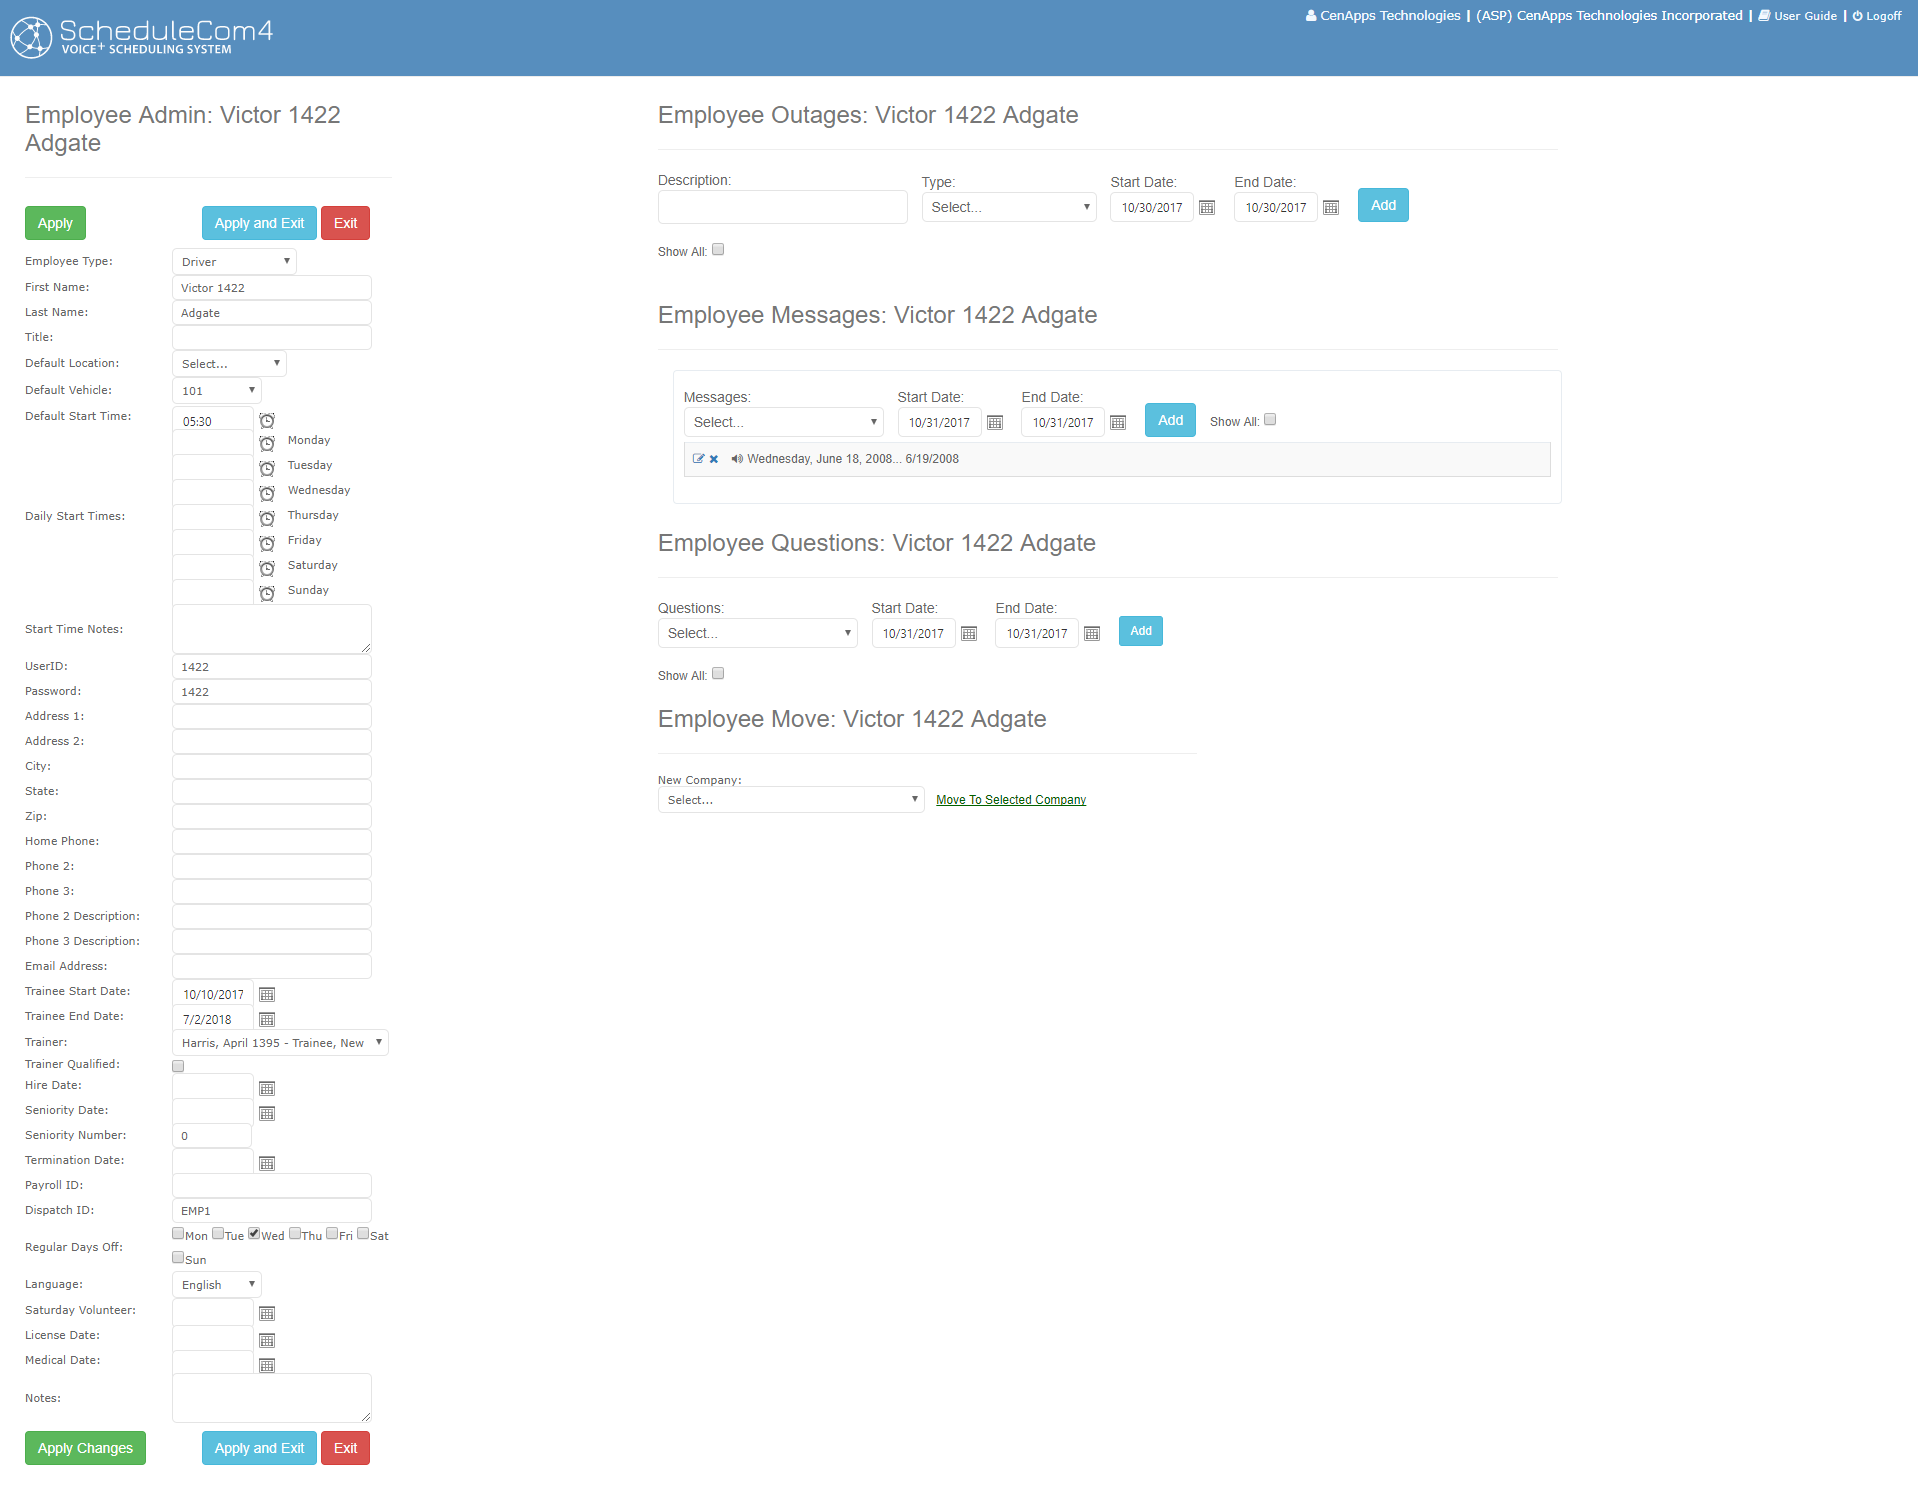
To assign a Trainer simply select a Trainer from the Trainer drop down list. An employee is considered a Trainee as long as there is a Trainee Start Date that is earlier than the current date and the Trainee End Date is blank or in the future. Click the Apply Changes to save this edit.
Scheduling a Trainer and a Trainee
By default if you schedule a Trainer to work and he has a Trainee associated with him, the Trainee will be scheduled to work as well. The Trainee’s start time, location and vehicle will default to the assigned Trainer’s information and cannot be edited independently.
The Scheduling Process
The scheduling process for ScheduleCom occurs in the Schedule tab of the user interface. Here you are able see the Current Schedule status (who is scheduled, whether they have retrieved their schedule, and how many hours they have worked), who has called in, who has volunteered for Saturday work, as well as links to Edit or Create the schedule. Here we will learn how to create as well as edit employee schedules.
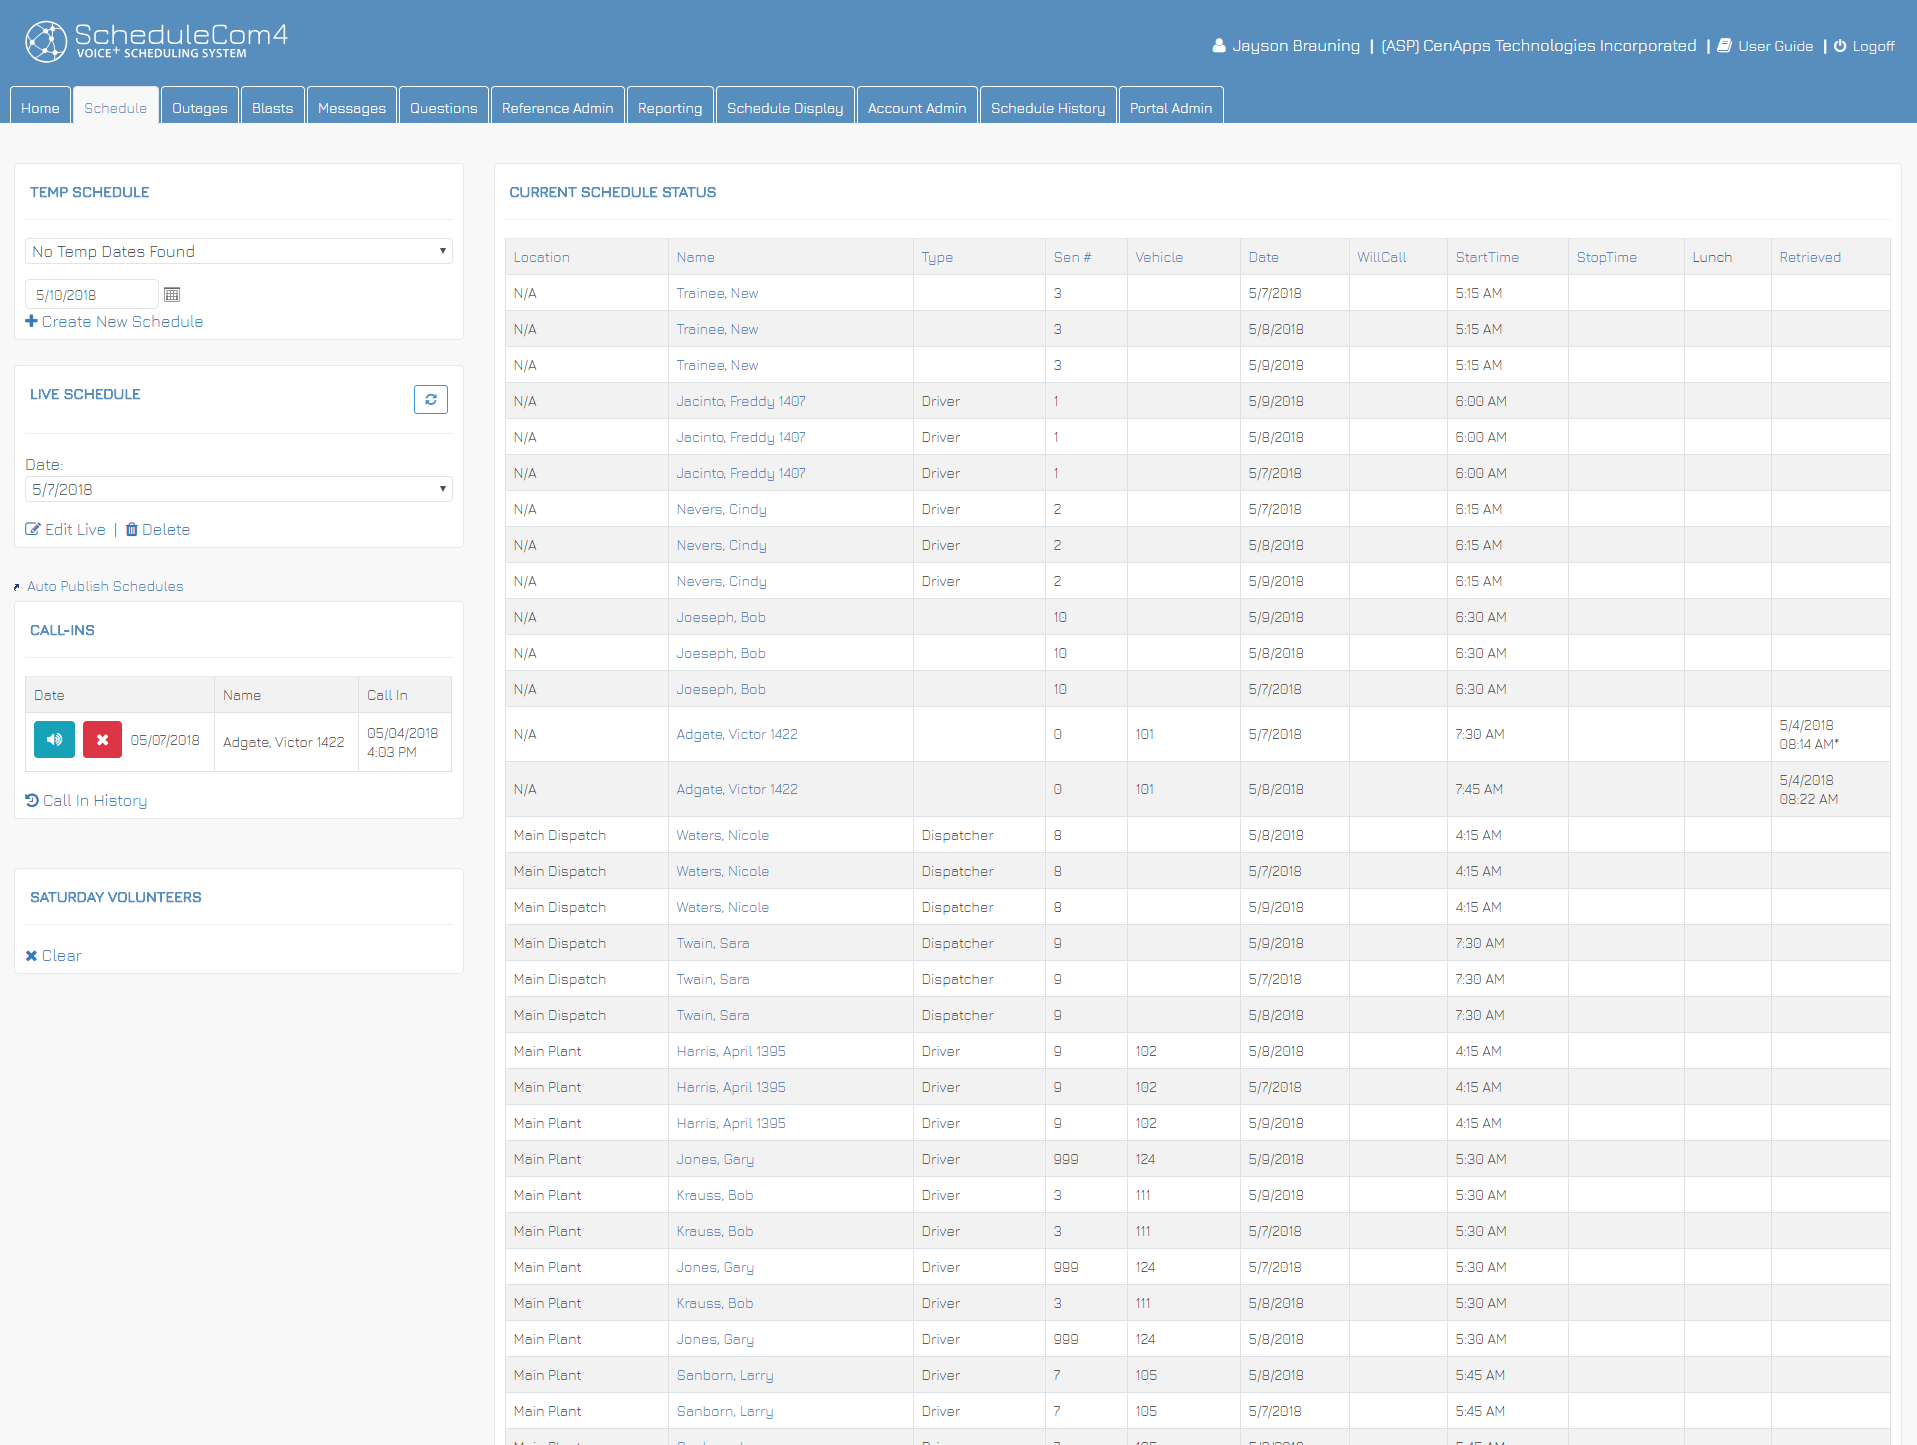
Creating a New Schedule
To create a new schedule, select the Schedule tab and in the Live Schedule window, modify the Schedule Date if necessary and click the New link.
A new Temporary schedule is created and the Schedule Entry Screen appears:
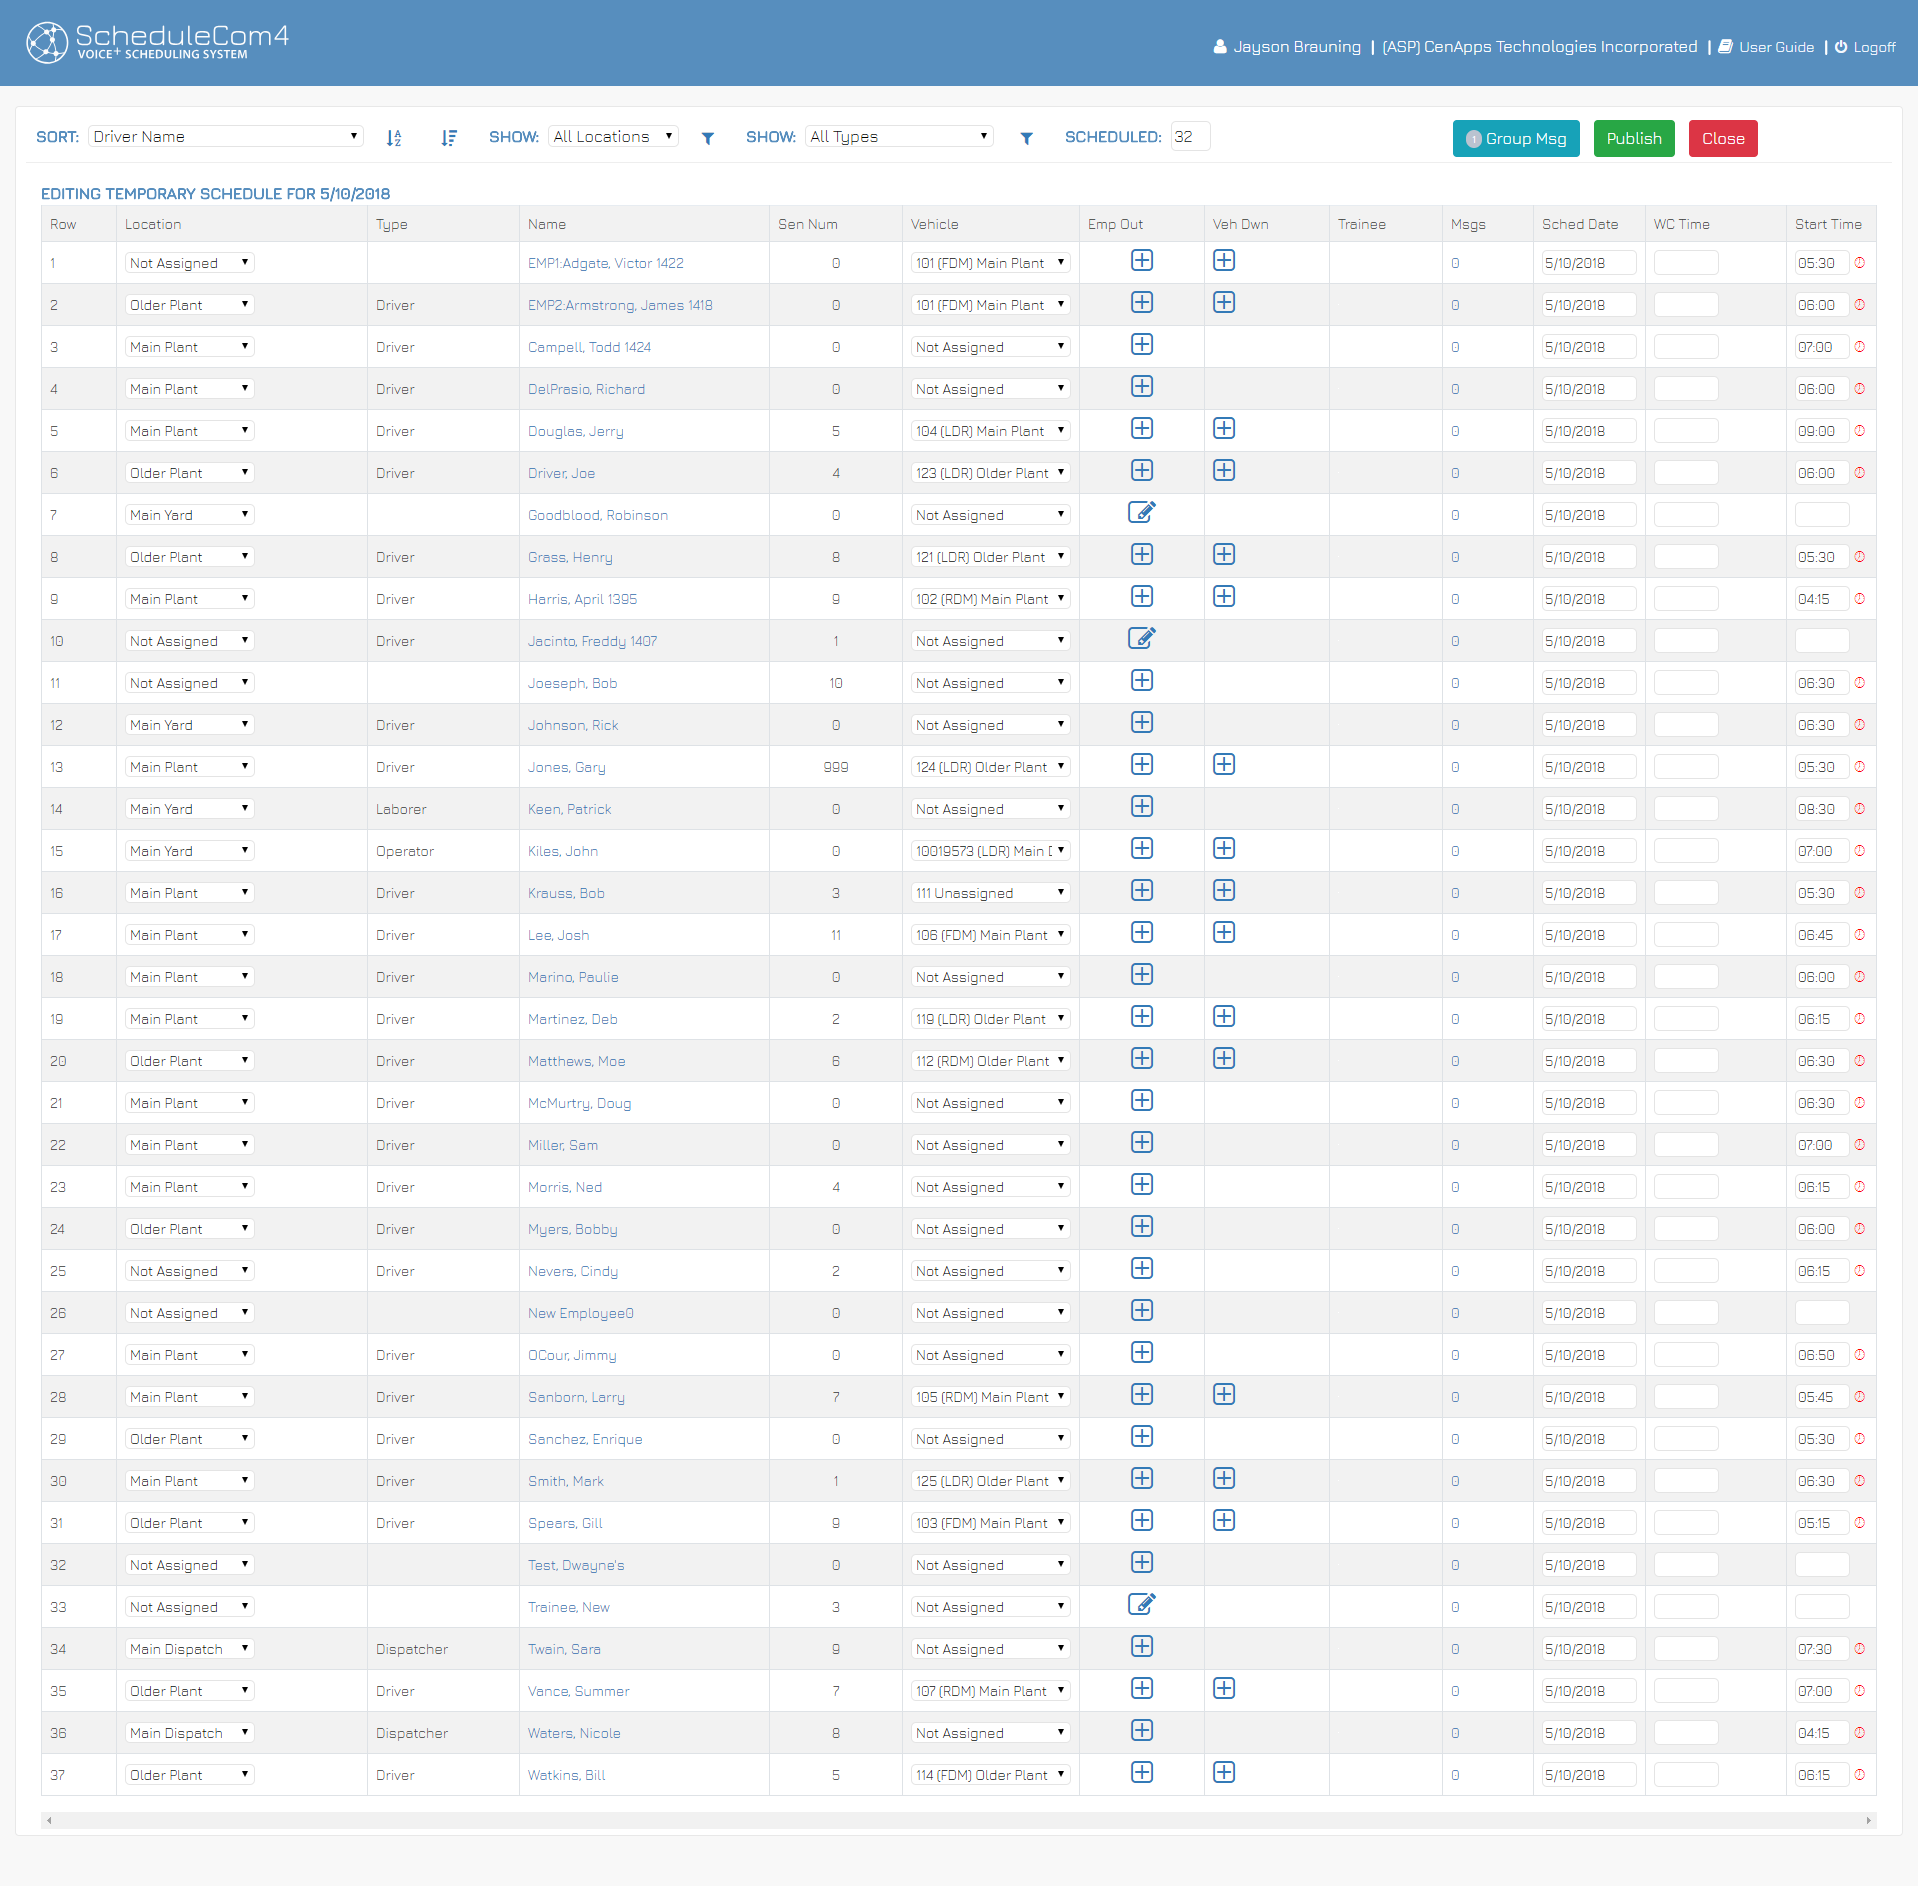
The Schedule Screen
Below is a list of the different elements that make up the scheduling screen. Click one to view its description.
Filtering
Near the top of the screen there are three sorting/filtering options. The first is a Sort listing which allows you to sort the information by predetermined choices (such as by Seniority or plant). There is also a Show Locations box and a Show Employee Types box. Using these, you would be able to filter the schedule to see only employees for a particular plant or see all drivers for all plants.
Scheduling Box
The link Group Msgs is next. This link allows you to set messages for a group of employees to hear. The number after the link indicates how many group messages are currently active. (See the Messaging process section below for more information).
Group Messages
The link Group Msgs is next. This link allows you to set messages for a group of employees to hear. The number after the link indicates how many group messages are currently active. (See the Messaging process section below for more information).
Publish
Next is the Publish link. Clicking this link publishes the current schedule.
Close
The /close link is used to close the current schedule screen and return to the Schedule Tab.
Row Counter
This is a guide to assist you when creating large schedules.
Starting Location
This will default to the location set on the Employee Edit Screen and can be changed during schedule creation.
Employee Type
This will display the employee’s type as set in the Employee Edit Screen. This cell cannot be edited on the Schedule Entry screen.
Employee Name
This will display the employee’s name as defined in the Employee Edit Screen. This cell cannot be edited on the Schedule Entry screen.
Seniority Date
This will display the employee’s seniority date as defined in the Employee Edit Screen. This cell cannot be edited on the Schedule Entry screen.
Vehicle Assignment
This will default to the vehicle assigned on the Employee Edit Screen and can be changed during schedule creation.
Employee Outage Indicator
If the employee has an outage entry that is effective for the current Schedule Date, a check mark will appear in this cell. Clicking in this cell will open the outage administration screen. Employee outages are discussed in detail below.
Vehicle Down Indicator
If the selected vehicle has an outage entry that is effective for the current Schedule Date, a check mark will appear in this cell. Clicking in this cell will open the outage administration screen. Vehicle outages are discussed in detail below.
Trainee Indicator
If the employee is a trainee, a check mark will appear in this cell. Clicking a checked Trainee Indicator will open the Temporary Trainer Assignment screen allowing you to assign this trainee to a different trainer see Managing the Training Process.
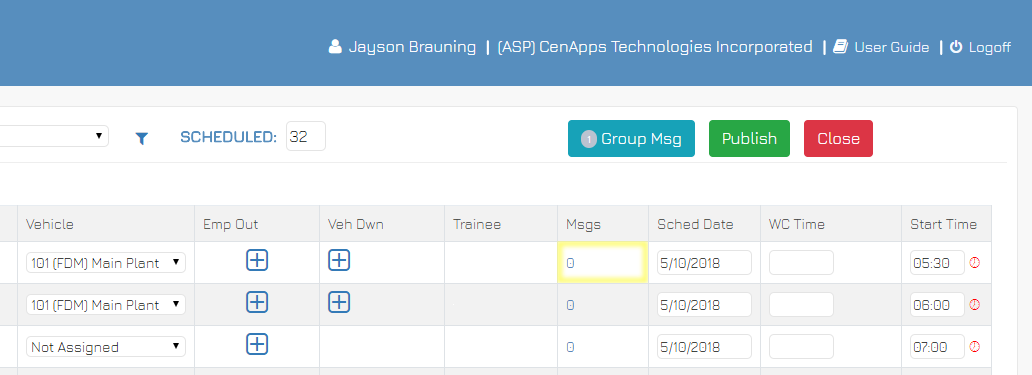
Employee Message Count
If the employee has messages configured to occur on the schedule date, the Employee Message Count will show the total number of messages to be played. Clicking in this cell will open the Individual Message Assignment screen allowing you to manage employee messages. Employee Messages are discussed in detail below.
Schedule Date
This cell displays the Schedule Date that the employee will hear when calling the system.
Will Call Time
This cell displays the Will Call Time that the employee will hear when calling the system.
Start Time
This cell displays the Start Time that the employee will hear when calling the system. Employees without a Start Time are not scheduled to work on the current schedule date. If the default location and truck assignments are correct, this is the only field you need to populate to create your schedule.
Default Start Time Indicator
The clock icon indicates that the employee has a default start time on the Manage Employees screen. Depending on your system configuration, default start times may auto-populate the schedule screen upon schedule create OR clicking the Default Start Time Indicator will populate the schedule screen manually.
Publishing a Schedule
Once a schedule has been created, you can publish it by clicking the Publish button on the Schedule Edit screen.
Publishing a schedule copies it from the Temporary area to the Live area. Live schedules are what employees hear when calling the system. You can refine the live schedule by clicking the Edit Live Schedule Link from the Schedule Tab. Publishing also clears the Temporary area.
Editing a Schedule
From the Schedule Tab you can to choose to edit either the Live (published) schedule (which the employees will hear when calling) or the Temp Schedule. Either choice will open the Schedule Entry screen and allow you to edit and save the revised schedule.
The Messaging Process
ScheduleCom’s Messaging functionality provides Three ways to assign messages in ScheduleCom:
- Through the Manage Employees Screen
- Through the Scheduling Screen
- Through the Messages tab
From the scheduling screen you can define a message in the system by entering a text message and assigning it to an employee or group of employees. When the employee dials in to the system to retrieve their schedule the message is converted from Text to Speech and spoken to the employee.
There are two types of messages available in ScheduleCom:
- Pre-defined Messages are created using the Message Administration section of the application discussed in the Reference Admin section earlier in this document. To create a pre-defined message, please follow the instructions in the Message Administration section.
-
Ad-hoc Messages are created during the scheduling process by clicking in the Message Count cell on an Employee record.
Messages can be sent to a group of employees or to an individual employee.
To Assign a Pre-defined Message to a Group
To assign a Pre-defined Group Message go to the Edit Schedule Screen and click the 0 Group Msg button in the header bar.
Select a Pre-defined Message from the Messages drop down list, select the employee type, location, Start and End Dates that you want the message played.
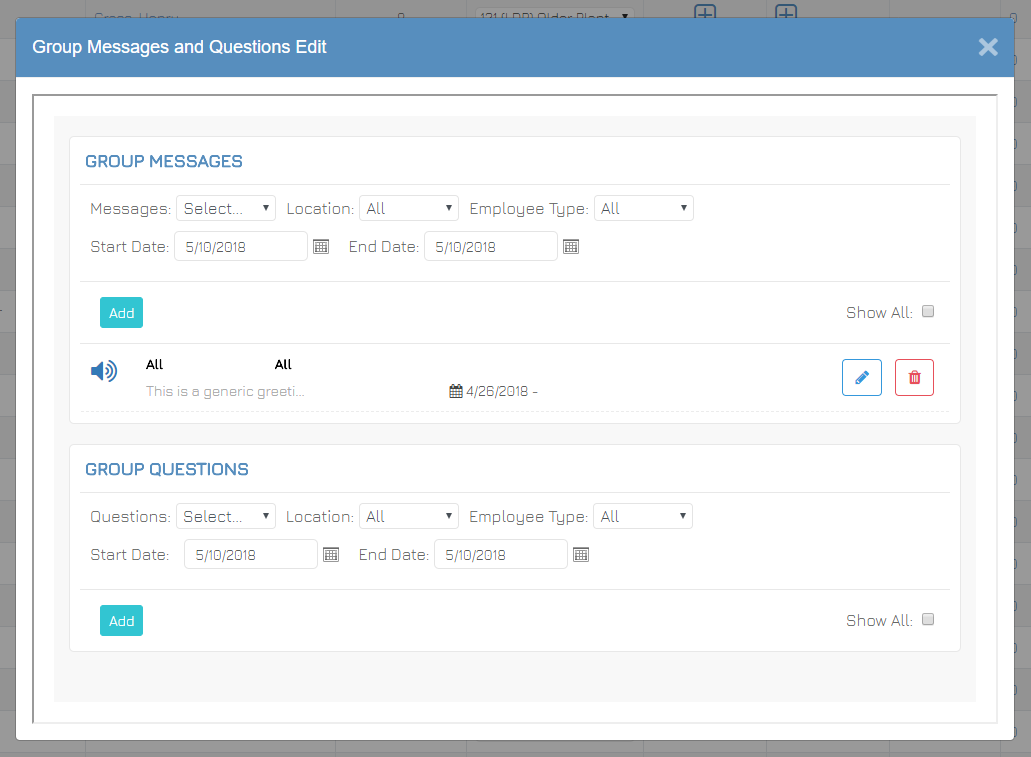
When you click the Add button, your message will be placed in the schedule and be displayed in a list below the add group message section of the Group Message window. Continue this process for any additional messages you wish to add to the schedule. You can also Preview , Edit or Delete an added message.
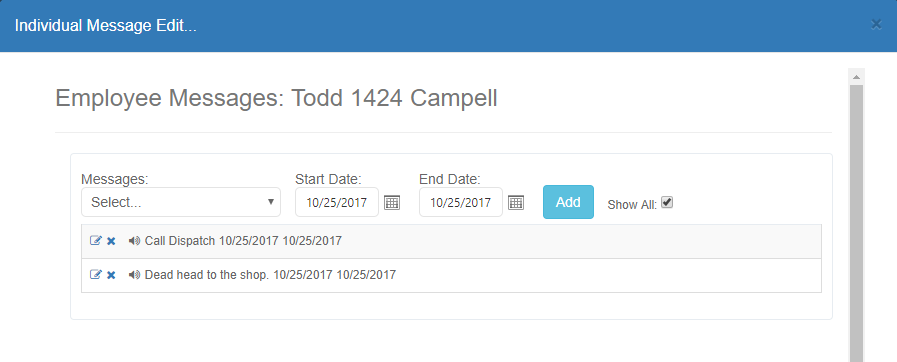
To Assign a Pre-defined Message to a Individual Employee
To assign a Pre-defined Message go to the Edit Schedule Screen and click the Msgs cell in the row of the employee that you would like to receive the message.
Select one of the pre-defined messages from the Messages drop down list, select the Start and End Dates that you want the message played.
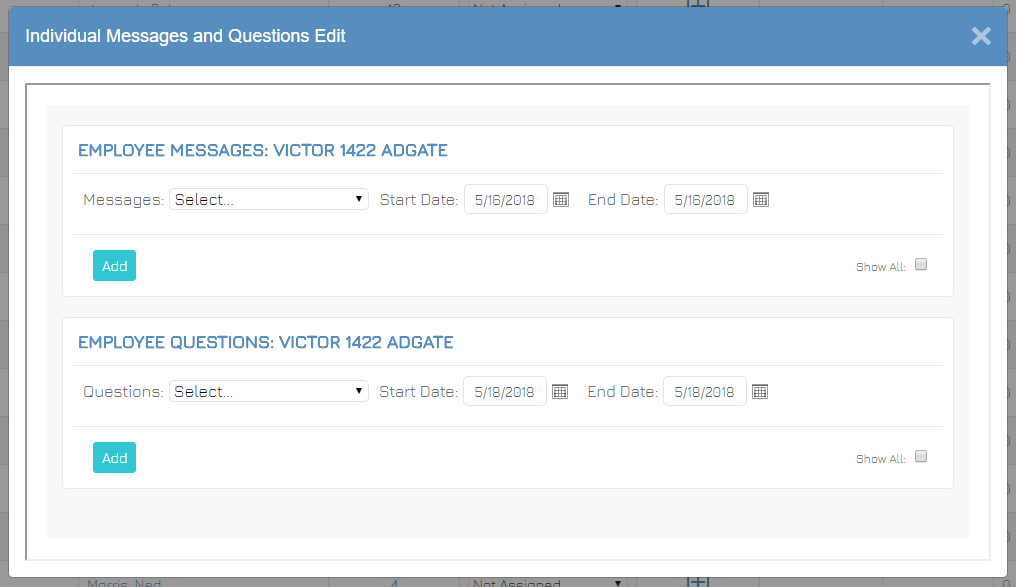
When you click the Add button, your message will be placed in the schedule and be displayed in a list below the add employee messages section of the Employee Messages window. Continue this process for any additional messages you wish to add for the employee. You can also Preview , Edit or Delete an added message. To see a list of all previously added messages for the selected employee, check the (Show All: ).
To Assign an Ad-Hoc Message to a Group
To assign a Ad-Hoc Group Message go to the Edit Schedule Screen and click the 0 Group Msg button in the header bar.
Select the Adhoc Msg from the Messages drop down list, select the employee type, location, Start and End Dates that you want the message played.
When you click the Add button, the edit Ad-hoc section will open below and a new Ad-hoc message will be added to the schedule.
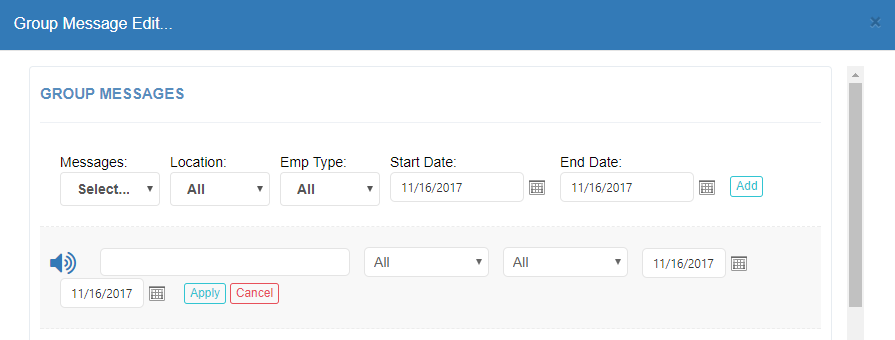
Type the message you want to be played into the empty text field. You can click the to preview the message. Choose the Apply button to save and close the edit section. You may also choose the Cancel button to close the edit section without saving.
To Assign an Ad-Hoc Message to an Individual Employee
To assign an
Select the Adhoc Msg from the Messages drop down list, select the Start and End Dates that you want the message played.
When you click the Add button, the edit Ad-hoc section will open below and a new Ad-hoc message will be added to the schedule.
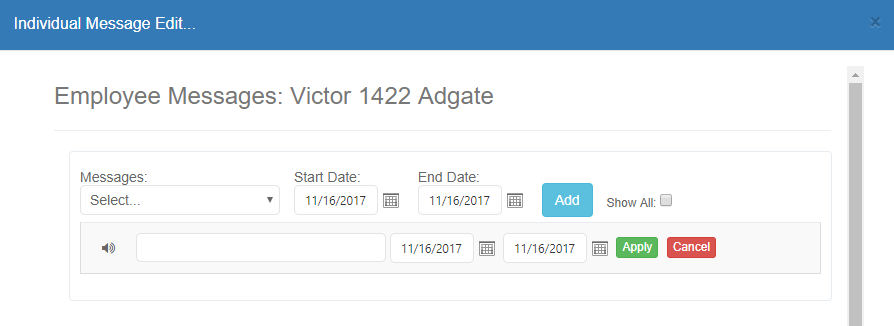
Type the message you want to be played into the empty text field. You can click the to preview the message. Choose the Apply button to save and close the edit section. You may also choose the Cancel button to close the edit section without saving.
Tracking Outages in ScheduleCom
The ScheduleCom system tracks two types of outages: Employee and Vehicle. Tracking outages allows the system to keep track of which employees are not available and which vehicles are out of service. To begin tracking outages, click on the Outage Tab of the ScheduleCom system.
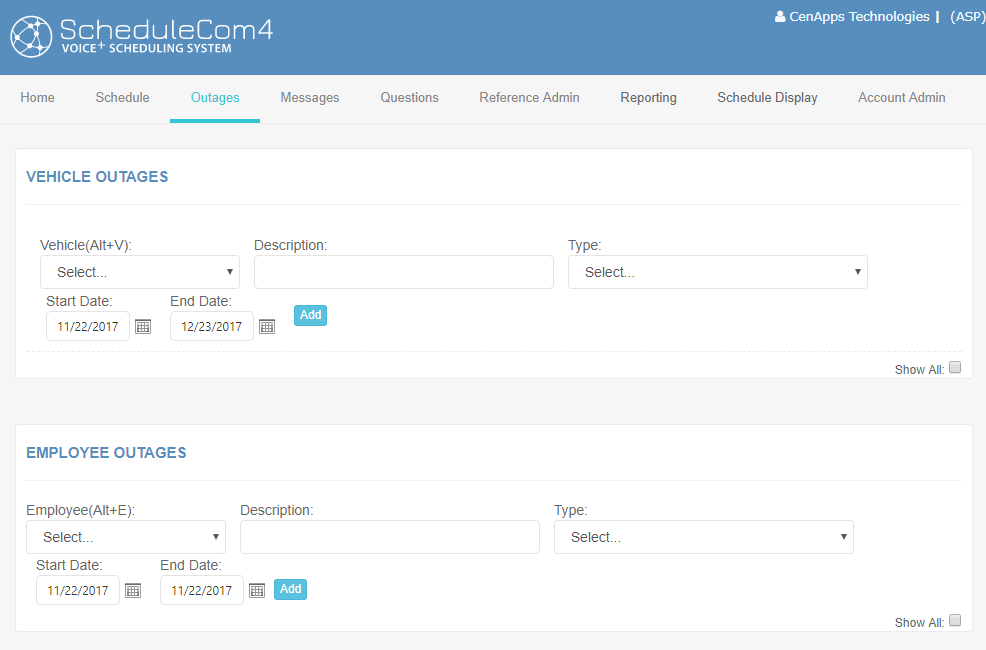
Vehicle Outages
Vehicle outages show which vehicles are out of order, the reason (Type/Description), when the outage starts and when it is expected to end.

To View Vehicle Outages
By default you will enter into the Outages screen in view mode. This simply allows you to see all the current open outages. An open outage is one in which there is a start date that has already begun and either an end date that has not occurred yet or no end date at all.
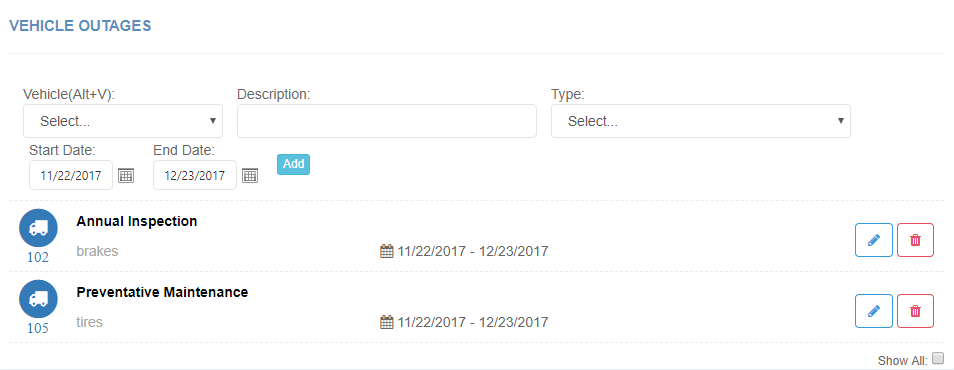
To see all vehicle outages, check Show All: and the screen will be refreshed will a listing of all past, present, and future outages.
To Add a Vehicle Outage
To add a vehicle outage, do the following:
- Select the Vehicle number that you want to add the outage for from the Vehicle drop down list.
- Enter a detailed description for the outage in the Description field if desired.
- Select a Type if desired from the drop down list.
- Enter a start date for the outage in the Start Date field.
- Enter an end date for the outage in the End Date field.
- Click the Add button to add the outage.
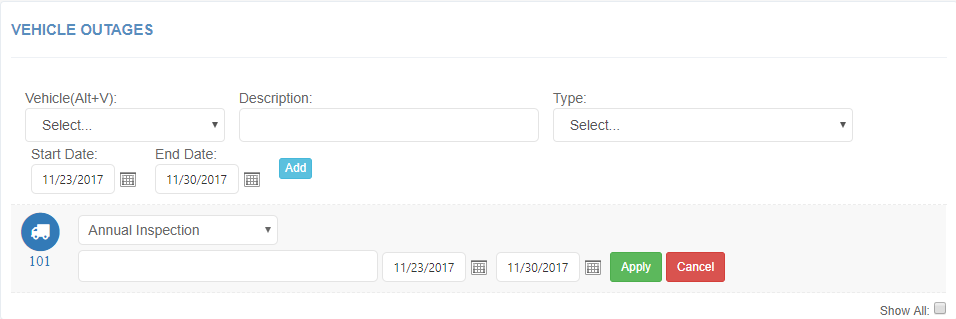
To Edit a Vehicle Outage
To edit a vehicle outage, do the following:
- Find the vehicle record the outage is for in the Vehicle Outage section and click . This will give you the ability to edit the Description, Start Date, and End Date of the outage.
- If you need to change the description of the outage do so in the Description field of the edit record.
- If you need to change the type of the outage select a new type or Select for no type from the Type drop down list.
- If you need to change the Start Date of the outage do so in the Start Date field of the edit record.
- If you need to change the End Date of the outage do so in the End Date field of the edit record.
- To save the changes to the vehicle outage record click Apply or click Cancel to cancel the changes without saving them.
To Delete a Vehicle Outage
To delete a vehicle outage, find the vehicle record the outage is for in the Vehicle Outage section and click . The outage will automatically be deleted.
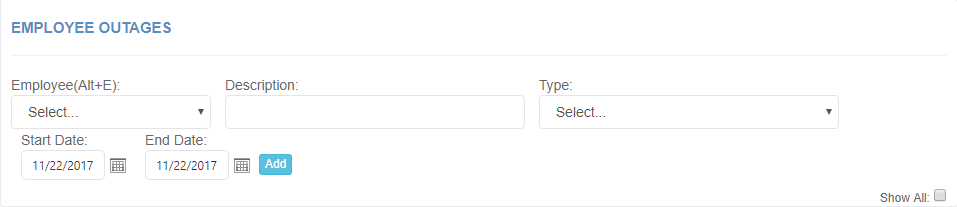
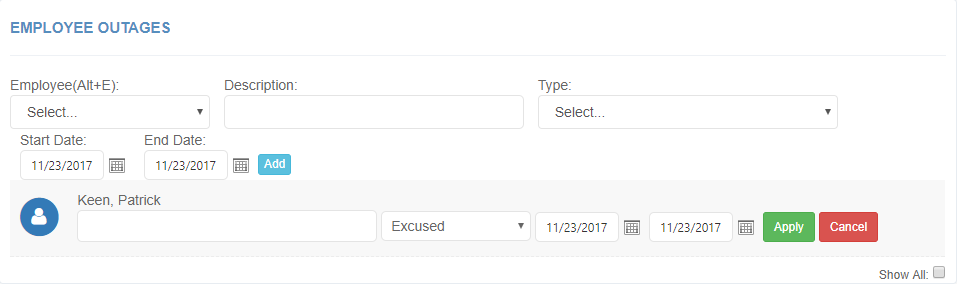
Employee Outages
Employee outages show which employees are out of the office, for what reason (description), when the outage starts and when it is expected to end.
To View Employee Outage
By default you will enter into the Outages screen in view mode. This simply allows you to see all the current open outages. An open outage is one in which there is a start date that has already begun and either an end date that has not occurred yet or no end date at all.
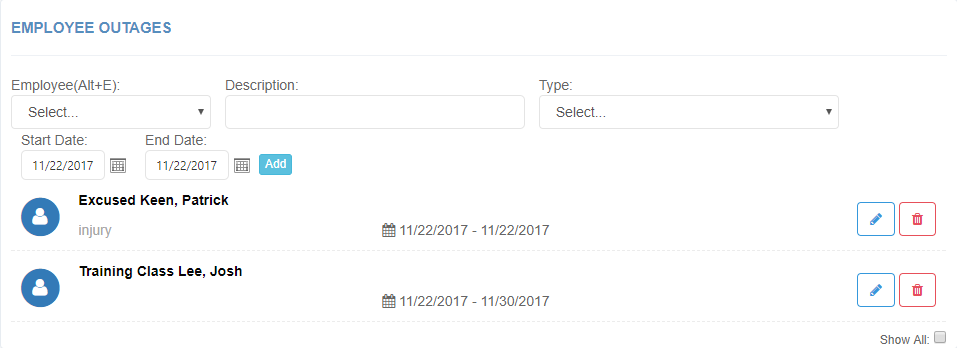
To see all employee outages, check Show All: and the screen will be refreshed will a listing of all past, present, and future outages.
To Add an Employee Outage
To add an employee outage, do the following:
- Select the Employee that you want to add the outage for from the Employee drop down list.
- Enter a detailed description for the outage in the Description field if desired.
- Select a Type if desired from the drop down list.
- Enter a start date for the outage in the Start Date field.
- Enter an end date for the outage in the End Date field.
- Click the Add button to add the outage.
To Edit an Employee Outage
To edit an employee outage, do the following:
- Find the employee record the outage is for in the Employee Outage section and click . This will give you the ability to edit the Description, Start Date, and End Date of the outage.
- If you need to change the description of the outage do so in the Description field of the edit record.
- If you need to change the type of the outage select a new type or Select for no type from the Type drop down list.
- If you need to change the Start Date of the outage do so in the Start Date field of the edit record.
- If you need to change the End Date of the outage do so in the End Date field of the edit record.
- To save the changes to the employee outage record click Apply or click Cancel to cancel the changes without saving them.
To Delete an Employee Outage
To delete a vehicle outage, find the vehicle record the outage is for in the Vehicle Outage section and click . The outage will automatically be deleted.
Message Blasts
Message Blasts are text messages that can be sent to employees mobile devices. Message Blasts can be set up by the company to allow them to be stored and used over again or can be created as an Ad-Hoc Message Blast for one time use. Message Blasts can be set to be sent automatically at a specific Date/Time. User's can choose employees and/or locations to whom they want to send the Message Blast.
Sending Message Blasts
There are two ways that Message Blasts can be sent in SchedulCom:
- On schedule publish, in Reference Admin if a Message Blast has been set up with the Send With Schedule Publish button checked. Reference Admin Message Blast
- On request via the Blasts tab.
Send Blast when Schedule's Published
When a new Message Blast is created in the Reference Admin Tab under the Message Blast section user's have the option to send with schedule publish via a check box. If the Send With Schedule Publish check box is checked the message is sent automatically when a new schedule is published. Only one Message Blast message can have this box checked, although it can be changed at anytime. If no messages have this box checked, then a message blast will not be sent when a new schedule is published. For more information on this option click the button bellow.
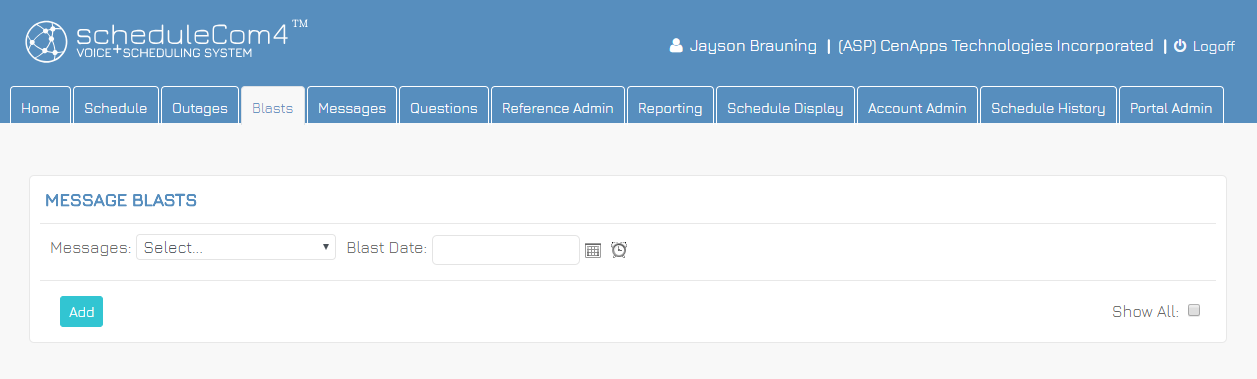
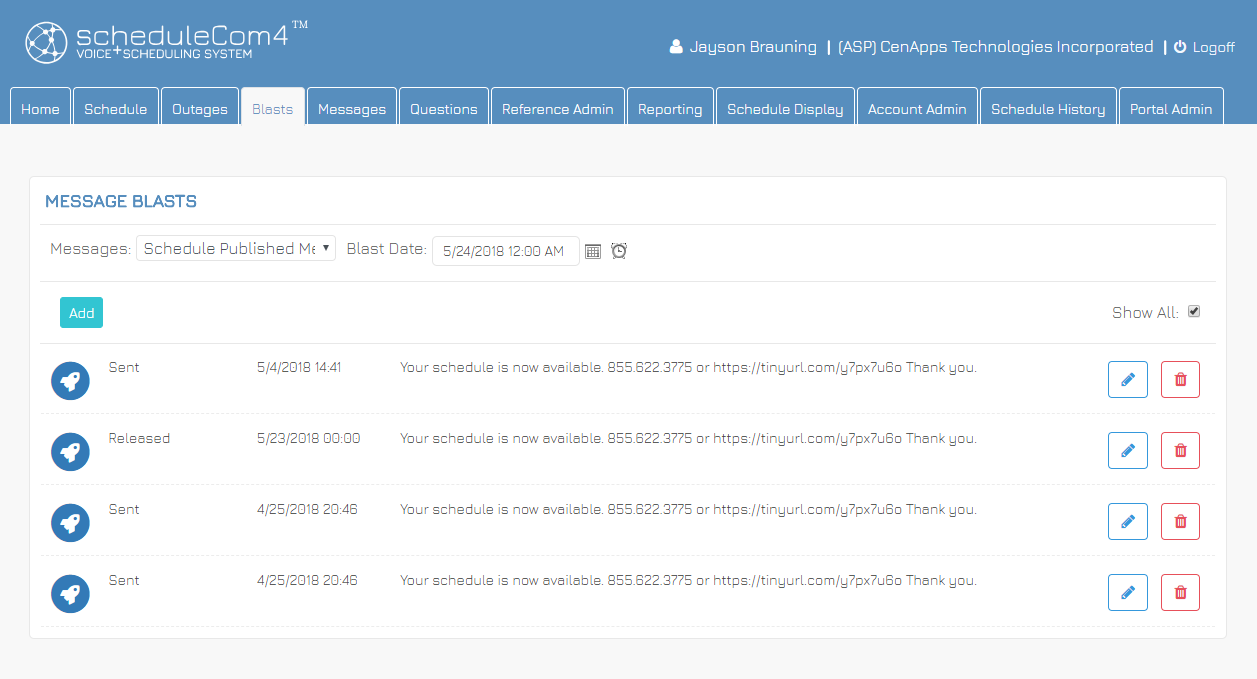
Send Blast Via Date and Time
Message Blasts can be sent via date and time. Select the Blasts tab and select a message from the drop-down list. Enter a date and time you would like the Message Blast to be sent at, this date cannot be in the past. In addition to the Pre-defined messages in the drop-down list, user's can also create Ad-Hoc messages for one time use. Click Ad-Hoc Message Blast for more information on creating an Ad-Hoc Message Blast. To see all Message Blasts, check Show All: and the screen will be refreshed will a listing of all past, present, and future blasts.
After selecting a message and entering a date click the Add button to enter the edit screen for the chosen message.
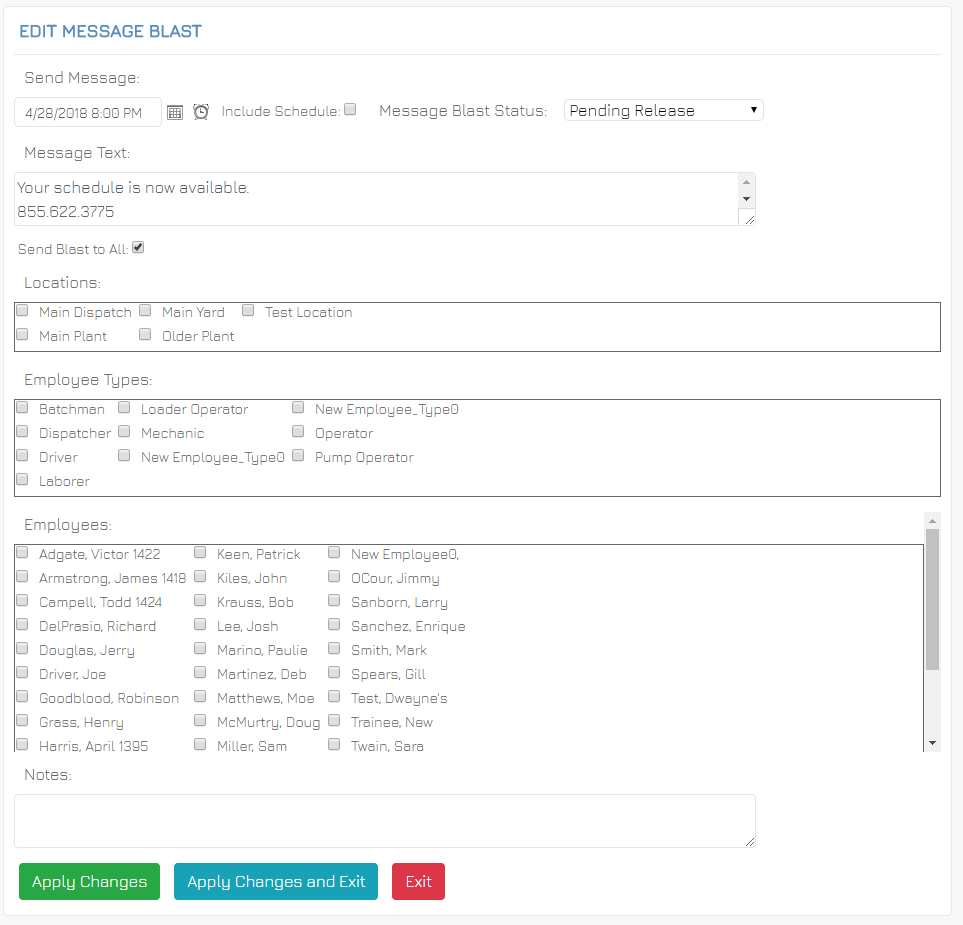
Fill out the fields described below. Choose Apply or Apply and Exit to complete the new Message Blast. You may also choose Exit at any time to return to the Message Blast page however any changes made will not be recorded unless you choose Apply before Exit
| Message Blast Field | Description |
|---|---|
| Send Message Date/Time | The date and time the message is to be sent. |
| Include Schedule | Check this box to have the employee’s current schedule added to the end of the message text. This is the same schedule the employee would hear if they called in for their schedule |
| Message Blast Status | The following status codes apply. Hold - Message is waiting for user to release it for sending. Messages are NOT sent in this status. Released - User sets to this status when it is ok to send the message to employees on Date/Time specified. Send Now - Send the blast when the apply button is clicked. Sent – Once the message has been sent to the employees, the status is changed to Sent. Sent messages can no longer be edited. |
| Message Text | The message text that will be sent. If a Reference Message Blast was selected, the text will default to that message text, but can be modified. If Ad-Hoc message is selected, the field will be blank and require user to enter the message text to be sent. |
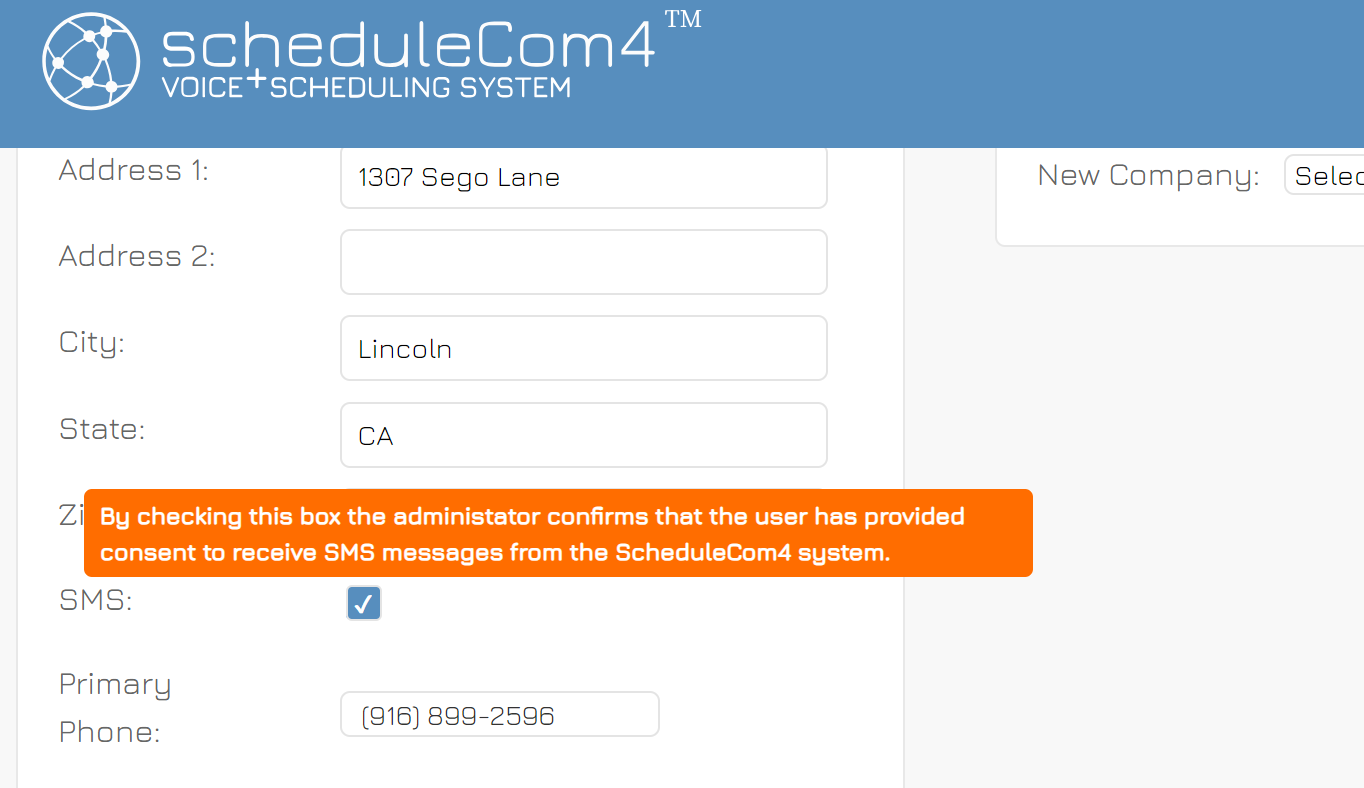
| Send Blast to All | Checking this box will cause the system to send the message to every employee with a Primary Phone number (see for more details) |
| Locations | Checking one or more locations will cause the message to be sent to only employees in the checked location(s). |
| Employee Types | Checking one or more employee types will cause the message to be sent to only employees of that type. |
| Employees | Checking employee(s) will cause the message to only be sent to the checked employees. |
| Notes | Notes are only for the message creator |
Ad-Hoc Message Blast
When you are in the Blasts Tab and are selecting a message blast to assign, the

Message Blast Recipients
Once a message has been sent, a list of employees that the message was intended for is created. It is possible to target employees for a message, but if they do not have a primary phone number for receiving the messages the system will indicate this.
| Employee | Number | Status | Status Date | Message |
| Adgate, Victor 1422 | +19162142040 | Sent | 4/23/2018 4:00 PM | Your schedule is available. |
| Armstrong, James 1418 | No Number | 4/23/2018 4:00 PM | ||
| Douglas, Jerry | No Number | 4/23/2018 4:00 PM | ||
| Keen, Patrick | No Number | 4/23/2018 4:00 PM | ||
| Krauss, Bob | No Number | 4/23/2018 4:00 PM |
Messages and Questions
The heart of the Scheduling system is the Voice Scheduling functionality. This allows an employee to call into the system using a standard telephone and retrieve their schedule from the database by entering their access information.
The Messaging functionality allows a user to type a text message into the system and assign it to an employee or group of employees. When the employee retrieves their schedule the text message is converted to speech and read to them.
The Questions functionality allows a user to create a question, assign acceptable answers to the question and assign the question to and employee or group of employees. Both Messages and Questions have two types: Pre-defined and Ad-Hoc. Pre-defined messages and questions allow the system to be configured with a list of frequently used items. Ad-Hoc messages and questions are typically used only once.
Employee Message Assignment in ScheduleCom
ScheduleCom’s Messaging functionality provides Three ways to assign messages in ScheduleCom:
- Through the Manage Employees Screen
- Through the Scheduling Screen
- Through the Messages tab
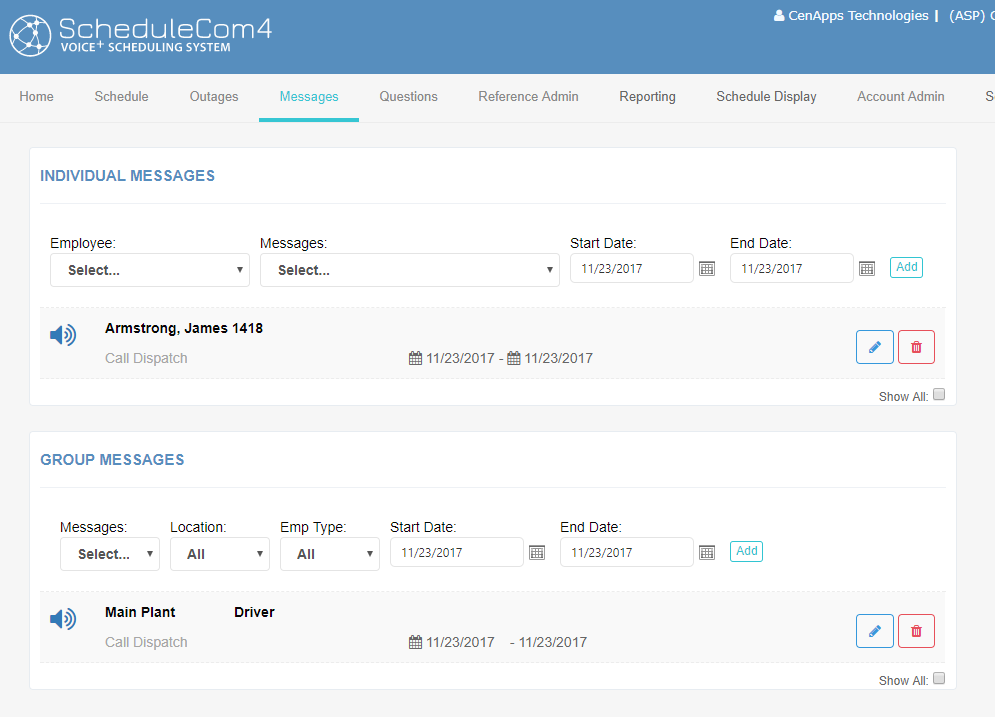
For users who do not have schedule edit or creation permission, the Messages tab will be the place for you to assign messages to employees. Currently the ScheduleCom system tracks two kinds of messages: Group and Individual. Group messages get sent to all employees of a specific type or at a specific location. Individual messages get sent to a specific employee in the company. To assign a message, click on the Messages Tab of the ScheduleCom system.
Message Types
With the individual and group message sections there are two types of messages. The first is
the Pre-defined message and the second is the
There are two types of messages available in ScheduleCom:
- Pre-defined Messages are created using the Message Administration section of the application discussed in the Reference Admin section earlier in this document. To create a pre-defined message, please follow the instructions in the Message Administration section.
-
Ad-hoc Messages are created during the scheduling process by clicking in the Message Count cell on an Employee record.
To Assign a Pre-defined Message
When you are in the Messages Tab and are selecting a message to assign, Pre-defined messages will appear in the drop down list with a name other than “Adhoc msg”. Pre-defined messages text can only be edited through the Messages administration section of the Reference Admin tab.
To Assign an Ad-Hoc Message
When you are in the Messages Tab and are selecting a message to assign, the
Individual Messages
Individual messages allow you to send specific private messages to a single individual, allowing you to communicate with them when they retrieve their schedule.
To View an Individual Message
By default you will enter into the Messages screen in view mode. This simply allows you to see all the current open messages. An open message is one in which there is a start time that has already begun and either an end date that has not occurred yet or no end date at all.
To see all individual messages, check Show All: and the screen will be refreshed will a listing of all past, present, and future messages.
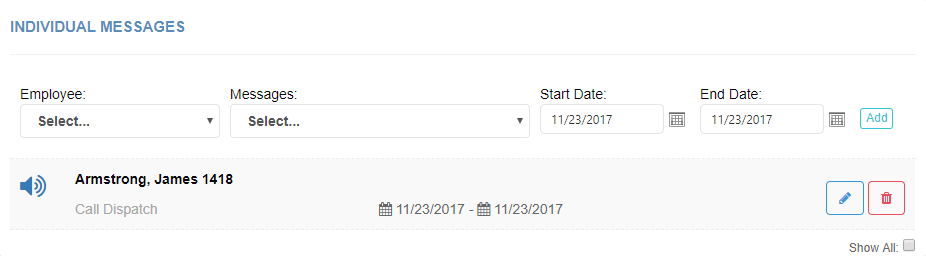
To Add an Individual Message
To add an individual message, do the following:
- Select the Employee that you want to assign a message to from the Employee drop down list.
- Select the Message that you want to assign from the Messages drop down list. Remember you have the option of using either a pre-defined message or an ad hoc message. If you need to enter a custom message make sure you select the ad hoc message.
- Enter a start date for the message in the Start Date field.
- Enter an end date for the message in the End Date field.
- Enter an end date for the outage in the End Date field.
- Click the Add button to add the message.
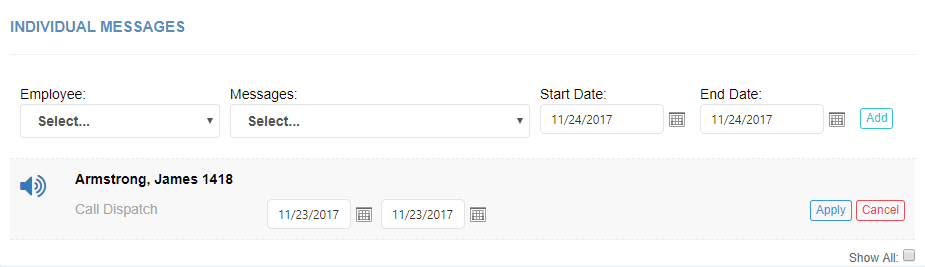
To Edit an Individual Message
To edit an individual message, do the following:
- Find the employee record the message is for in the Individual Message section and click the . This will give you the ability to edit the Start Date, and End Date of the message.
- If you need to change the Start Date of the message do so in the Start Date field of the edit record.
- If you need to change the End Date of the message do so in the End Date field of the edit record.
- To save the changes to the individual message record click Apply or click Cancel to cancel the changes without saving them.
To Delete an Individual Message
To delete an individual message, find the employee record the message is for in the Individual Message section and click the . The message will automatically be deleted.
Group Messages
Group messages allow you to send messages to groups of employees. These groups could be for a specific location, a specific employee type (such as all drivers), or to the entire company, allowing you to communicate with them when they retrieve their schedule.
To View a Group Message
By default you will enter into the Messages screen in view mode. This simply allows you to see all the current open messages. An open message is one in which there is a start time that has already begun and either an end date that has not occurred yet or no end date at all.
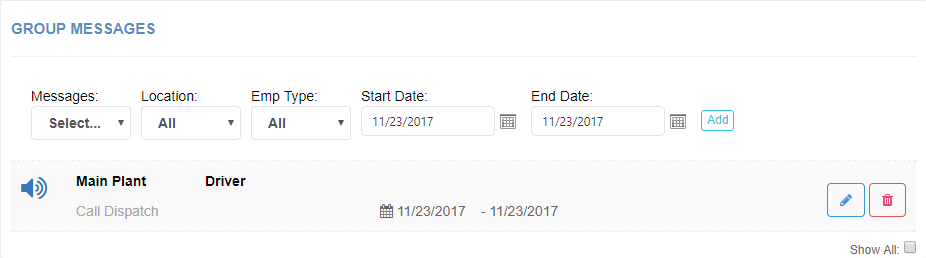
To see all group messages, click Show All: and the screen will be refreshed will a listing of all past, present, and future messages.
To Add a Group Message
To add a Group Message, do the following:
- Select the Message that you want to assign from the Messages drop down list. Remember you have the option of using either a pre-defined message or an ad hoc message. If you need to enter a custom message make sure you select the ad hoc message.
- Enter a start date for the message in the Start Date field.
- Enter an end date for the message in the End Date field.
- Select the Location that you want to assign a message to from the Location drop down list.
- Select the Employee Type that you want to assign a message to from the Emp Type drop down list.
- Click the Add button to add the message.
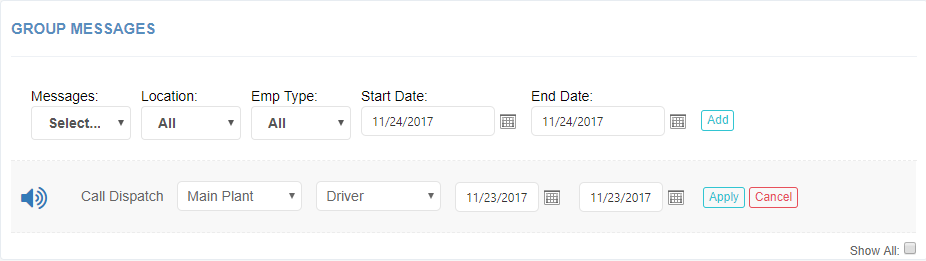
To Edit a Group Message
To edit a group message, do the following:
- Find the message record the message is for in the Group Message section and click the . This will give you the ability to edit the Start Date, End Date, Location, and Employee Type of the message.
- If you need to change the Start Date of the message do so in the Start Date field of the edit record.
- If you need to change the End Date of the message do so in the End Date field of the edit record.
- If you need to change the Location the message is assigned to do so from the Location drop down list.
- If you need to change the Employee Type the message is assigned to do so from the Employee Type drop down list.
- To save the changes to the group message record click Apply or click Cancel to cancel the changes without saving them.
To Delete a Group Message
To delete a group message, find the Group Message record in the Group Message section and click . The message will automatically be deleted.
Employee Question Assignment in ScheduleCom
Like messages, several types of employee questions can be created in ScheduleCom:
- Individual Questions
- Group Questions
- Pre-Defined Questions
- Ad-Hoc Questions
Questions can be assigned to employees in one of three ways:
- Through the Manage Employees Screen
- Through the Scheduling Screen
- From the Questions tab.

Individual Questions
Individual questions allow you to ask a specific private question of a single individual, allowing you to communicate with them when they retrieve their schedule.
To View an Individual Question
By default you will enter into the Questions screen in view mode. This simply allows you to see all the current open questions. An open question is one in which there is a start time that has already begun and either an end date that has not occurred yet or no end date at all.
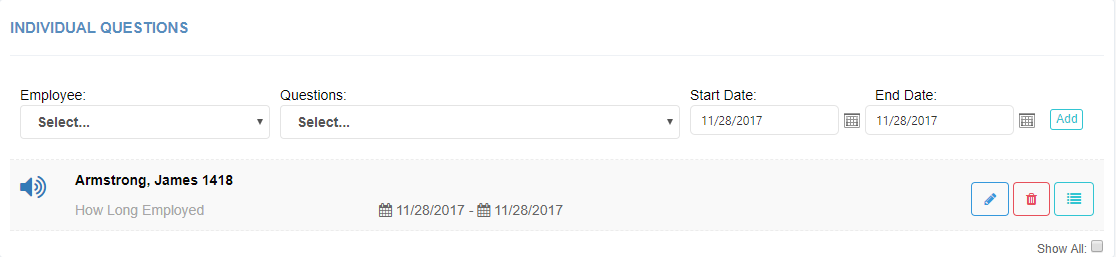
To see all individual questions, click Show All: and the screen will be refreshed will a listing of all past, present, and future questions.
To Add an Individual Question
To add an individual question, do the following:
- Select the Employee that you want to assign a question to from the Employee drop down list.
- Select the Question that you want to assign from the Questions drop down list. Remember you have the option of using either a pre-defined question or an ad hoc question. If you need to enter a custom question make sure you select the ad hoc question.
- Enter a start date for the question in the Start Date field.
- Enter an end date for the question in the End Date field.
- Click the Add button to add the question.

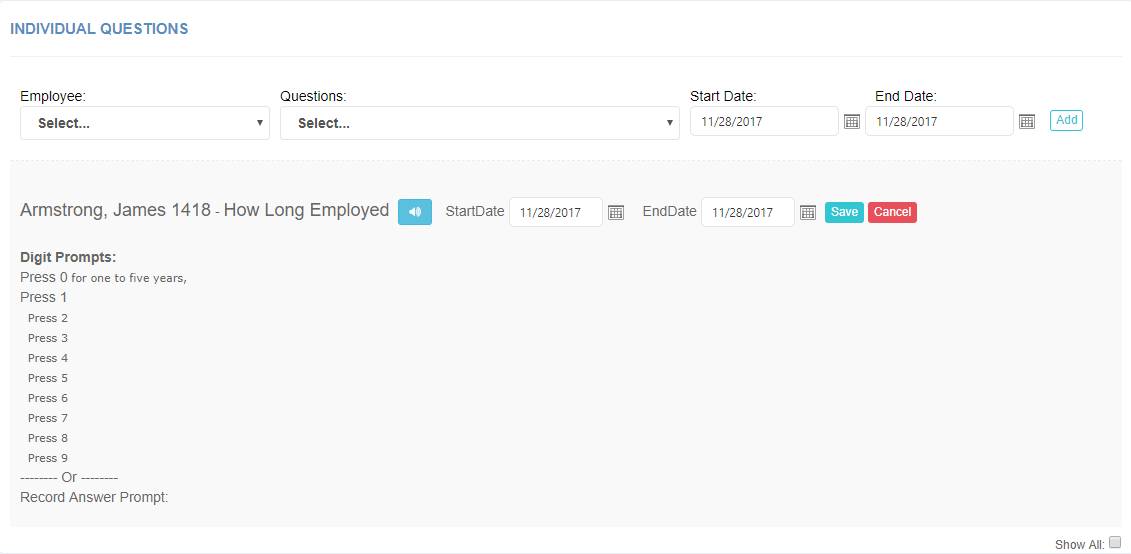
To Edit an Individual Question
To edit an individual question, do the following:
- Find the employee record the question is for in the Individual Questions section and click the . This will give you the ability to edit the Start Date, and End Date of the question.
- If you need to change the Start Date of the question do so in the Start Date field of the edit record.
- If you need to change the End Date of the question do so in the End Date field of the edit record.
- To save the changes to the individual question record click Save or click Cancel to cancel the changes without saving them.
To Delete an Individual Question
To delete an individual question, find the individual question record in the Individual Questions section and click . The message will automatically be deleted.
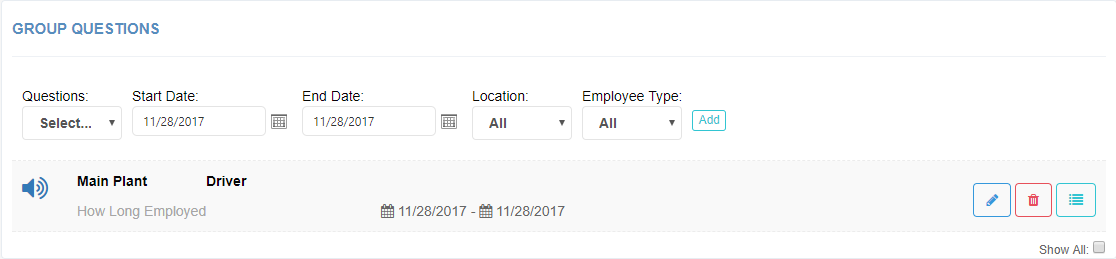
Group Questions
Group questions allow you to ask questions to groups of employees. These groups could be for a specific location, a specific employee type (such as all drivers), or to the entire company, allowing you to communicate with them when they retrieve their schedule.

To View a Group Question
By default you will enter into the Questions screen in view mode. This simply allows you to see all the current open questions. An open question is one in which there is a start time that has already begun and either an end date that has not occurred yet or no end date at all.
To see all group questions, click Show All: and the screen will be refreshed will a listing of all past, present, and future questions.
To Add a Group Question
To add a group question, do the following:
- Select the Question that you want to assign from the Questions drop down list. Remember you have the option of using either a pre-defined question or an ad hoc question. If you need to enter a custom question make sure you select the ad hoc question.
- Enter a start date for the question in the Start Date field.
- Enter an end date for the question in the End Date field.
- Select the Location that you want to assign a question to from the Location drop down list.
- Select the Employee Type that you want to assign a question to from the Employee Type drop down list.
- Click the Add button to add the question.

To Edit a Group Question
To edit a group question, do the following:
- Find the question record the question is for in the Group Questions section and click the .. This will give you the ability to edit the Start Date, End Date, Location, and Employee Type of the question.
- If you need to change the Start Date of the question do so in the Start Date field of the edit record.
- If you need to change the End Date of the question do so in the End Date field of the edit record.
- If you need to change the Location the question is assigned to do so from the Location drop down list.
- If you need to change the Employee Type the question is assigned to do so from the Emp Type drop down list.
- To save the changes to the group question record click Save or click Cancel to cancel the changes without saving them.
To Delete a Group Question
To delete a group question, find the group question record in the Group Questions section and click . The message will automatically be deleted.
To View Answers to Questions
Once a question is created and assigned to employees, the system will begin prompting the employees and storing their answers. Answers are viewed by clicking the button on the questions tab:
Opening the answers for a question displays a list of all recorded answers:

Answers for questions using the Record Answer Prompt appear with a preview button to allow your to listen to each recorded answer:
Saturday Volunteers
By default, ScheduleCom is configured to prompt employees to volunteer for working on Saturdays. During the call process, employees can answer Yes or No for Saturday work. Employees who have answered Yes will be added to the Saturday Volunteer List on the Schedule Tab:
| Location | Name | Volunteered |
| Not Assigned | Adgate, Victor 1422 | 11/27/2017 5:42 PM |
Clearing the Saturday Volunteer List
Saturday volunteers will remain in the on-screen list until:
- A Saturday schedule is published or
- The Clear Saturday Volunteers link on the Schedule tab is clicked
| Location | Name | Volunteered |
| Not Assigned | Adgate, Victor 1422 | 11/27/2017 5:42 PM |
Currently volunteered employees are included in the Saturday Volunteer Listing on the Reporting tab.
Employee Call-In
During Schedule Playback, ScheduleCom prompts employees to leave a call in message to record sick outages or other call in messages. Employees who have left a call in message will be included in the Call In list on the Schedule tab:
| Date | Name | Call In |
| 11/28/2017 | Brauning, Jayson |
11/28/2017 10:11 AM |
Clicking the button will play the recorded audio message left by the employee.
Clearing the Call Ins List
Employee Call Ins remain on screen for a designated number of days (typically 7 days). Once the current schedule date is 7 days past the call in date, the call in is removed from the screen.
Additionally, Call Ins can be manually cleared from the Schedule Tab by clicking the in the Schedule Date Column.
| Date | Name | Call In |
| 11/28/2017 | Brauning, Jayson |
11/28/2017 10:11 AM |
Call In History
The Schedule Tab also includes a link Call In History . Clicking this link opens the Call In History Screen:
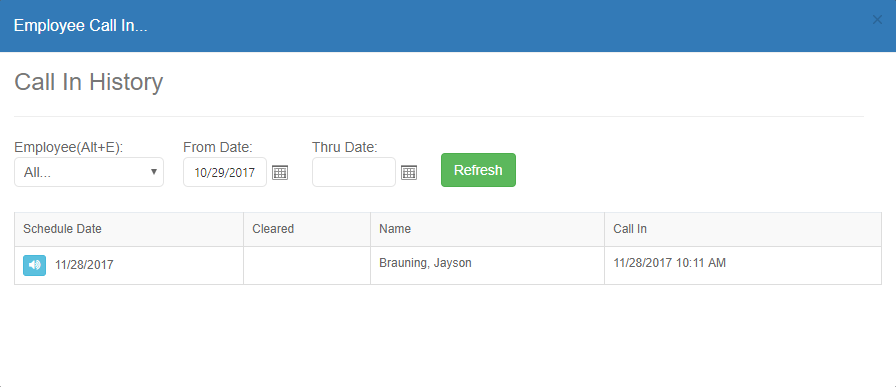
This screen lists all Call Ins, both cleared and un-cleared. The list can be filtered by Employee
Name, Start Date and End Date.
From the Call In history screen you can preview Call Ins, clear Call Ins and un-clear call ins.
Employee Call Ins are also listed in the Employee Call Ins Listing on the Reporting Tab.
Reports in SchedulCom
The reporting tab of the ScheduleCom application provides a list of available reports that can be run from the system as well as different filters that can be placed on the report to get the information you are looking for. A filter allows you to select specific criteria to narrow or focus the results you get back. For example, maybe you want to run a report that gives you a list of Employees. In ScheduleCom you can do this two ways. You can run the report with no filters which will give you a list of Employees for all locations or you can specify a location (filter) that you want a list of Employees for. Running this last report with the filter would give you only the Employees from the location you selected. It is important to know that there can be multiple filters for a specific report, as you will see in the reporting tab. Using different filter combinations can give you great control over the information you are looking for.
How to Run Reports
The majority of the ScheduleCom reports are in the Reporting tab. For convenience you may find duplicate reports through out the other tabs of the application. For example the Basic Listing Reports on the Reporting tab can also be found next to their respective reference table items in the Reference Admin tab.
| Manage Employees | |
|
|
|
| Employees: | Add Employee Listing Edit Seniority Numbers | Inactive Employees: | Reactivate | ||
Main Reports

Each report in the main reporting section of the Reporting tab has a View button next to it. If the report has a filter option you can filter the report by selecting a value from the filter drop down lists or entering a date into the date filter for that report. Clicking the View button after selecting the filters will process the report based on the data you selected and will display the information on the screen.
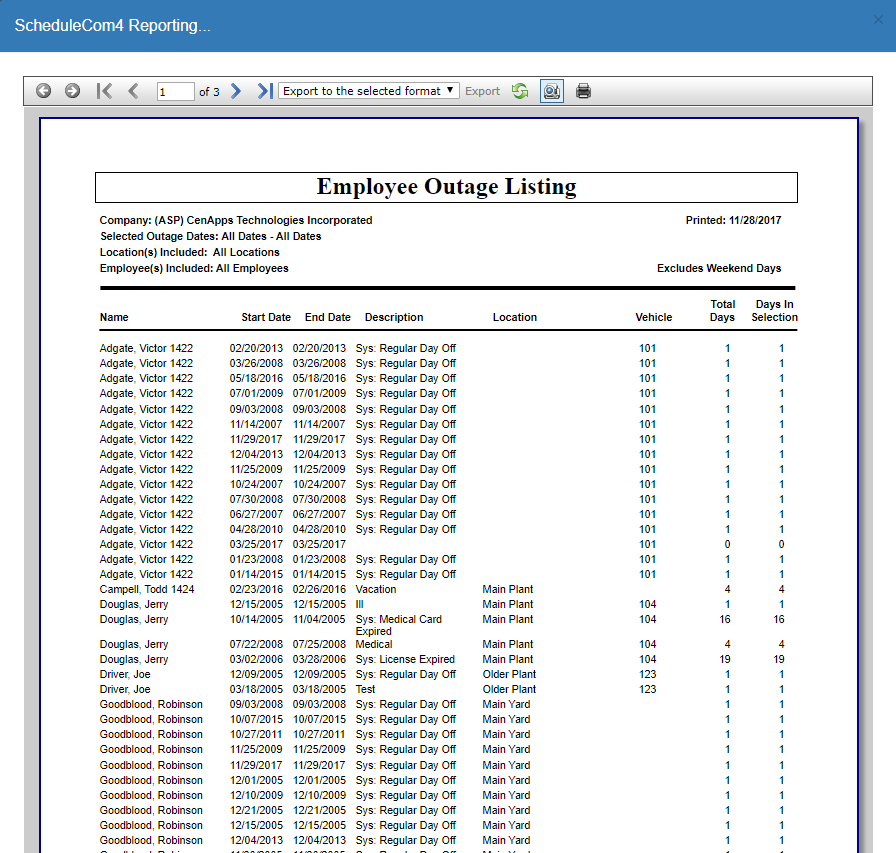
Basic Listing Reports
The Basic Listing reports provide a list of the reports subject matter in a report format. For example an Employee Listing will provide a list of Employees by name, employee type and location and will provide their phone number, ID, and Default Vehicle Number if they have one. There are no filters on Basic Listing Reports.
To run a basic listing report go to the Basic Listings area of the Reporting Tab or go to the Reference Admin tab and look for the Reference information you want a listing for. In the Reporting Tab the Basic Listing reports are identified by the name of the Reference Table they provide a listing for. Simply click on the report name and the detail behind that report will be displayed on the screen.
On the Reference Admin Tab, the listing reports have the word Listing behind the Reference information they represent. Clicking on one of these links will display the information behind the report.
| Manage Employees | |
|
|
|
| Employees: | Add Employee Listing Edit Seniority Numbers | Inactive Employees: | Reactivate | ||
Dialing into the Voice System
Dialing into the ScheduleCom is easy to do. Follow these steps to use the system:
- Dial the phone number provided by Dispatch to retrieve your schedule.
- When prompted enter your UserID followed by the pound (#) sign.
- When prompted enter your Password followed by the pound (#) sign.
- Your schedule, as well as any messages and/or questions will be read to you by the system.
- If dispatch is accepting volunteers for Saturday shifts you will be asked if you want to volunteer. Press the number 1 on your telephone keypad to volunteer for Saturday work, otherwise press the number 0 to continue.
- If there are no other messages you will be given the following prompt: Press 1 to hear your schedule again, Press 2 to leave a call in message (If Call In Messages are configured), Press 3 to receive a text of your schedule, Press 4 to change your voice selection, Press 5 to change your password, Press 6 to remember or forget this phone number, or Press 0 to hang-up.


Accessing the Schedule via the Web
Accessing a user's schedule via the web can be done by using the My Schedule link on the ScheduleCom Log In screen.
Users's can also access it directly with the URL http://myschedule.schedulecom4.com in any web browser.
Once in the My Schedule log in screen; user's will be asked to enter UserID* and PIN*, when complete click the
Show My Schedule button to login and view their schedules.
scheduleCom4 ™
Once in the View Schedule screen users's can view Schedule Details, leave a Call In Message, Volunteer for work, or change their PIN.
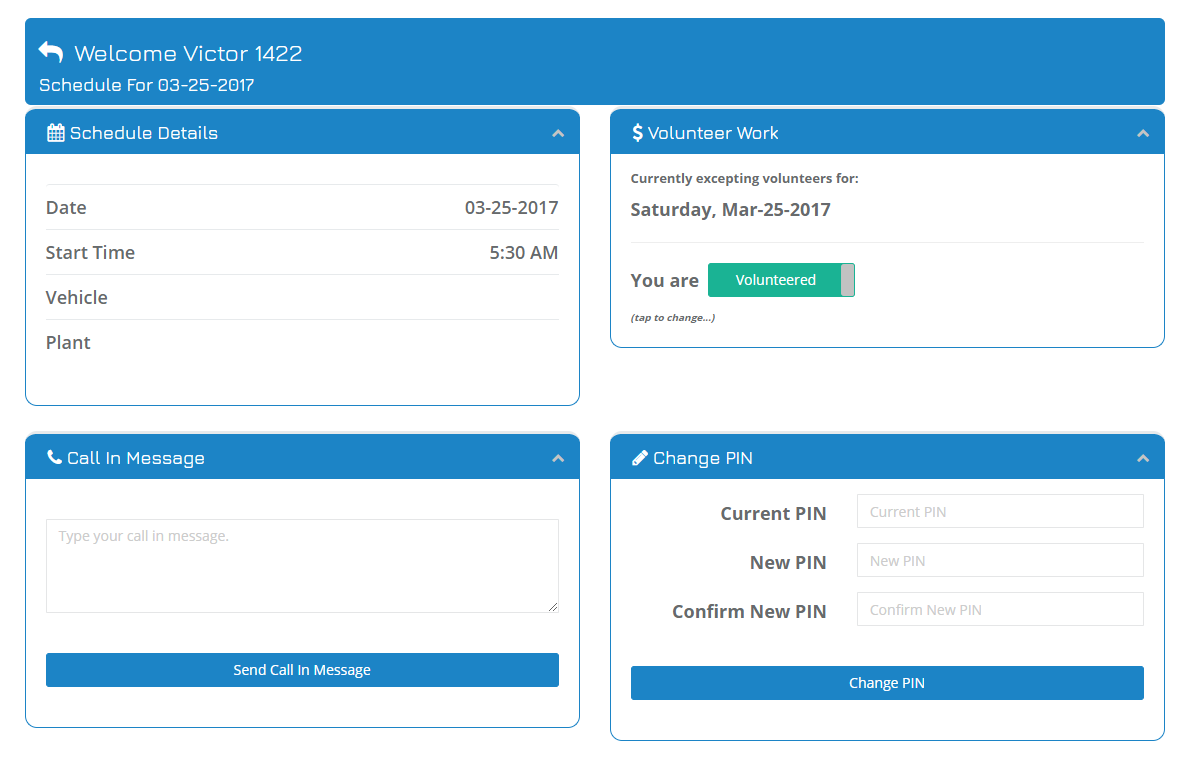
Account Admin
The Account Admin section allows you to manage Company and User level information. This includes managing companies and managing users. To view the Account Admin section just click on the Account Admin tab from any main page.
Manage Companies
ScheduleCom has the ability to support multiple companies and assign a user to more than one
company. Upon login a user with access to more than one company can select an active
company. Any changes made by the user will apply to the active company only.
The Manage Companies section of the Account Admin screen allows you to Edit a company
from the application. Once in the Account Admin screen select what you would like to do to a
company.

To Edit a Company
From the Account Admin screen select an Employee from the Companies drop down list under the Manage Companies section of the screen. Click the pencil icon to edit the employee record. In the Edit Company screen you can edit any field you see. Choose Apply or Apply and Exit to apply changes and complete the edit. To exit without saving any edits made to the Company record choose Exit.
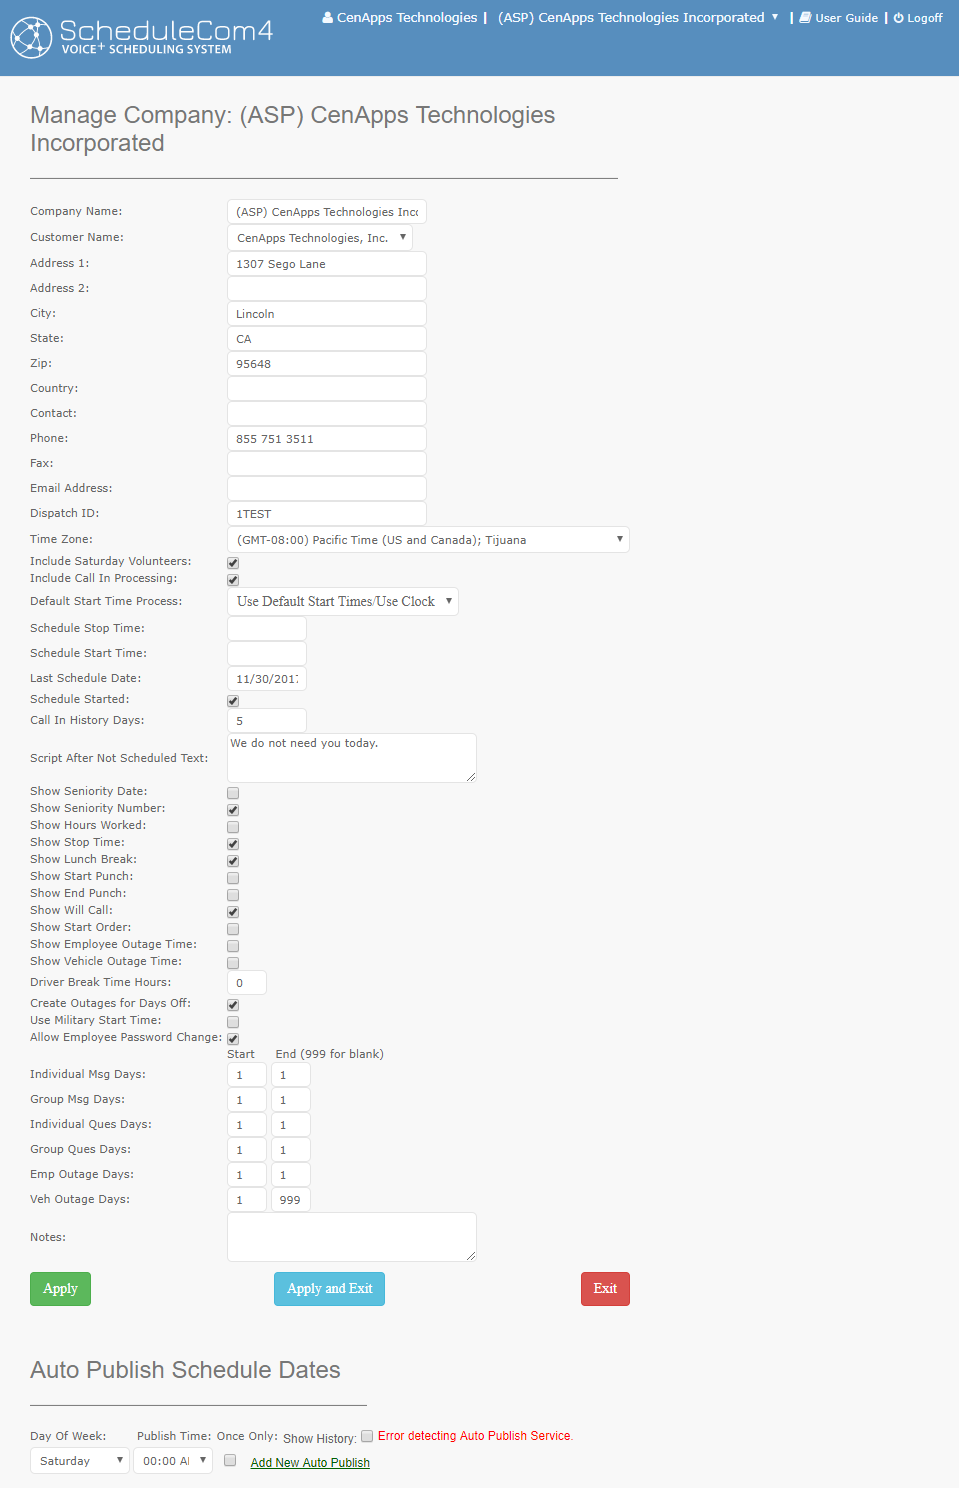
For the most part an Account Admin will not need to edit a company after the initial installation and configuration.
The important information is outlined in the following list:
- Company Name
- E-mail Address
- Dispatch ID – Used to tie ScheduleCom to your dispatch software if there is an interface
- Time Zone – Select the correct time zone for the company
- Include Saturday Volunteers (Do you ask for volunteers for Saturday shifts)
- Include Call In Processing (Do you want to be able to capture an employee’s call in message? i.e. sick, late, etc.)
-
Default Start Time Process: This process allows you to choose how you want default
start times to work and uses the following logic:
Option Explanation No Default Start Times/No Clock The system will not use default start times in the scheduling process. No Default Start Times/Use Clock The clock icon will appear on the scheduling screens for employees with default start times. Clicking the clock will populate "Start Time" with default start time. Use Default Start Times/Use Clock The system will populate "Start Time" with default start times. The clock icon will also appear allowing users to reset a modified start time back to default start time. Use Default Start Times/No Clock The system will populate "Start Time" with default start times. The clock icon will not appear on the scheduling screens. - Schedule Stop Time – The time during the day that you want the schedule to stop playing for employees. The system plays “Your schedule is not currently available, please try again later.”
- Schedule Start Time – The time that you want the schedule to become available. If this field is left blank the schedule becomes available when published.
- Last Schedule Date – The date of the last schedule that was published. This field should not be changed, it is populated by the publish process.
- Schedule Started – This indicates if the schedule is currently started and available to employees. The program will update this based on schedule start/stop times.
- Call In History Days – Determines how many days of call in history is shown on the schedule tab.
- Script after not scheduled text – This text will be played to an employee that was not scheduled for the current workday. This is played after any messages/questions.
- Show Seniority Date – If checked the Seniority Date field will be displayed on the schedule screens
- Show Seniority Number – If checked the Seniority Number field will be displayed on the schedule screens
- Show Hours Worked – If checked the Hours Worked field will be displayed on the schedule screens
- Driver Break Time Hours – If there is an hours interface this field is used to determine how many hours an employee should have off before being available again. The schedule screen uses this to alert the scheduler if the employee has not been off long enough
- Create Outages for Days Off – If checked then an outage will be created for any employee that has regular days off checked in their reference record
- Use Military Start Time – If checked the start time will be read in military time format (24 hour clock)
- Allow Employee Password Change – If checked the employee will be given the option to change their password when retrieving their schedule
- Msg/Ques/Outage Days – The values are used to determine the default dates that are placed in the respective start and end date fields for these items. The number of days are added to the current date to determine the default dates.
Manage Users
ScheduleCom is an Account-based system and requires a Username and Password to access
it. To do this we create user records, which identify a user, their access ID, and their role in the
system. This allows us to secure the application and identify which users have access to which
functions. It also allows us to identify which users have accessed the system.
The Manage Users section of the Account Admin screen allows you to Add, Edit, and Delete a
user as well as Reactivate any Inactive Users. Once in the Account Admin screen select
what you would like to do to a user.
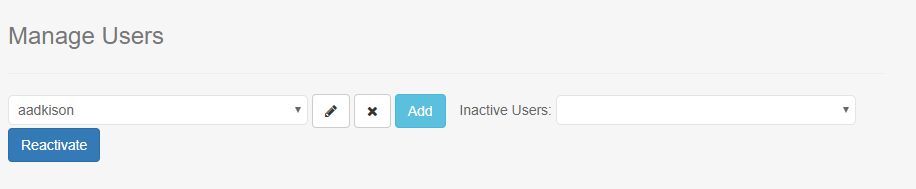
To Add a New User
Click the Add button next to the drop down list of Registered Users. This will take you to the Manage User screen and will automatically generate a user record for you.
This will usually consist of a username New User and some number (i.e. New User0). Change the Username to the one you would like to use for this user and then fill out the remaining pertinent information. Choose Apply Changes or Apply Changes and Exit to complete the new record.
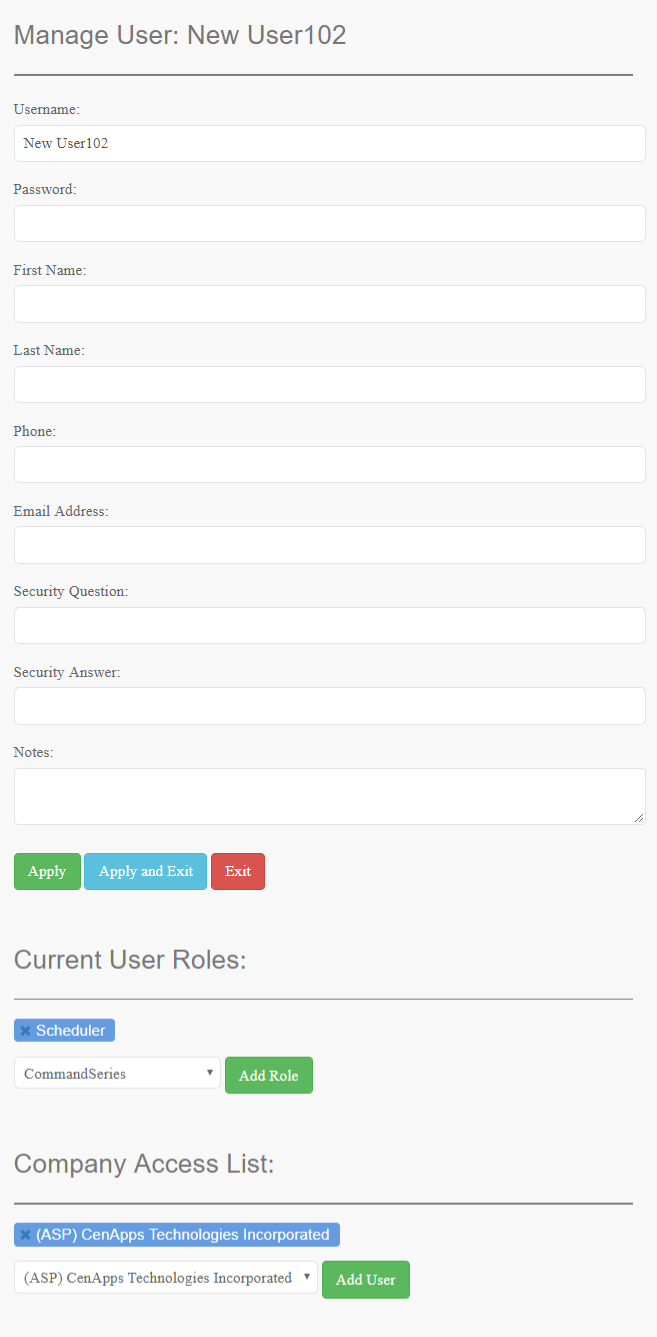
Once your information is submitted you can then add the New User to a Role and a Company from the same screen. Simply select the Role this user is to play and click Add user to role. You must then add the User to a Company. By default the user will be added to the company that you are currently logged into and creating the new user record from. However you can add the user to other companies, if there are any, by selecting the Company name from the drop down list and clicking the Add user to company link. Once you add a user to a role or a company you will see the name of that role or company show up below the Current User Role(s) or Current User Companies section of the screen. Once your changes are saved click the Exit link to return to the Account Admin screen.
To Edit a User
From the Account Admin screen select a User from the User drop down list under the Manage Users section of the screen. Click the pencil icon to edit the Users record. Just like in the Add User screen you can edit any field you see. Choose Apply or Apply and Exit to apply changes and complete the edit. To exit without saving any edits made to the Users record choose Exit.
From this screen you can also add or delete a User from a Role or Company. To do Add a User to a Role simply select the Role you want to add the user to and then click the Add user to role. To delete a user from a role simply click the next to the role you want to delete and confirm the deletion. Follow the same process to add or delete a user from a company under the Current Companies section of the screen. Once your changes are saved click the Exit button to return to the Account Admin screen.
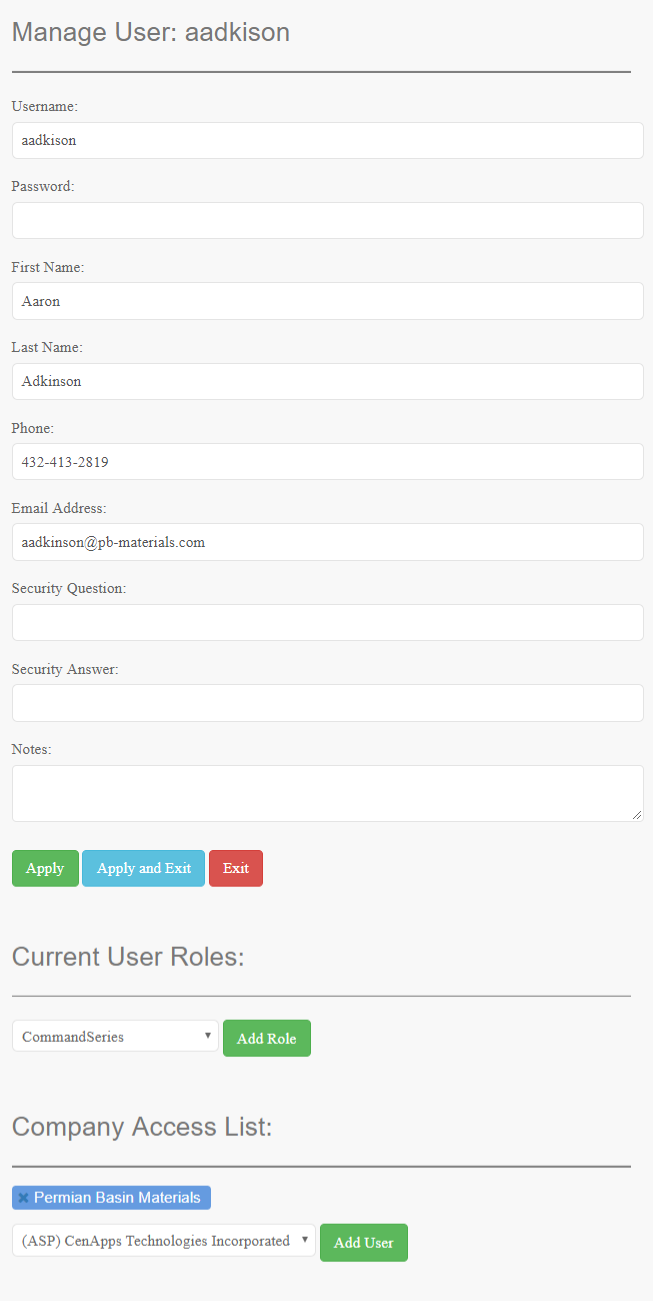
To Delete a User
From the Account Admin screen select a User from the User drop down list under the Manage Users section of the screen and click the icon. When the "Continue with delete?" dialog box comes up click OK and the delete will be processed. If you clicked the icon by mistake or have changed your mind, simply click the Cancel button on the Delete Dialog Box and you will be returned to the screen without deleting the record.
Required Hardware
Any computer or mobile device capable of accessing the web with one of the acceptable browsers.
Microphone
A Microphone is required to use the text-to-speech functionality. ScheduleCom will function without however you will be unable to listen to how the system will render text to speech messages. In addition to having a microphone connected you will also need to allow ScheduleCom access to the microphone in your browser settings.
Allow ScheduleCom Microphone Access in Chrome
Upon clicking the a small camera icon will appear in the address bar. Clicking on this icon will open a window that will allow or block ScheduleCom from accessing the microphone. Select the allow radio-button and click apply. Click the again to hear the message.
You can also allow ScheduleCom access to the microphone through the browsers settings. The microphone setting are in the advanced setting under content settings.
Settings>Advanced>ContentSettings>Microphone